Showing posts with label Peaceful Moments. Show all posts

Sunday, 4 September 2022

#CTC385 CASE a Glitter Project


CASE a Glitter Project


The card on the bottom of Page 33 of the Jul-Dec Mini Catalogue called out to me for this one:


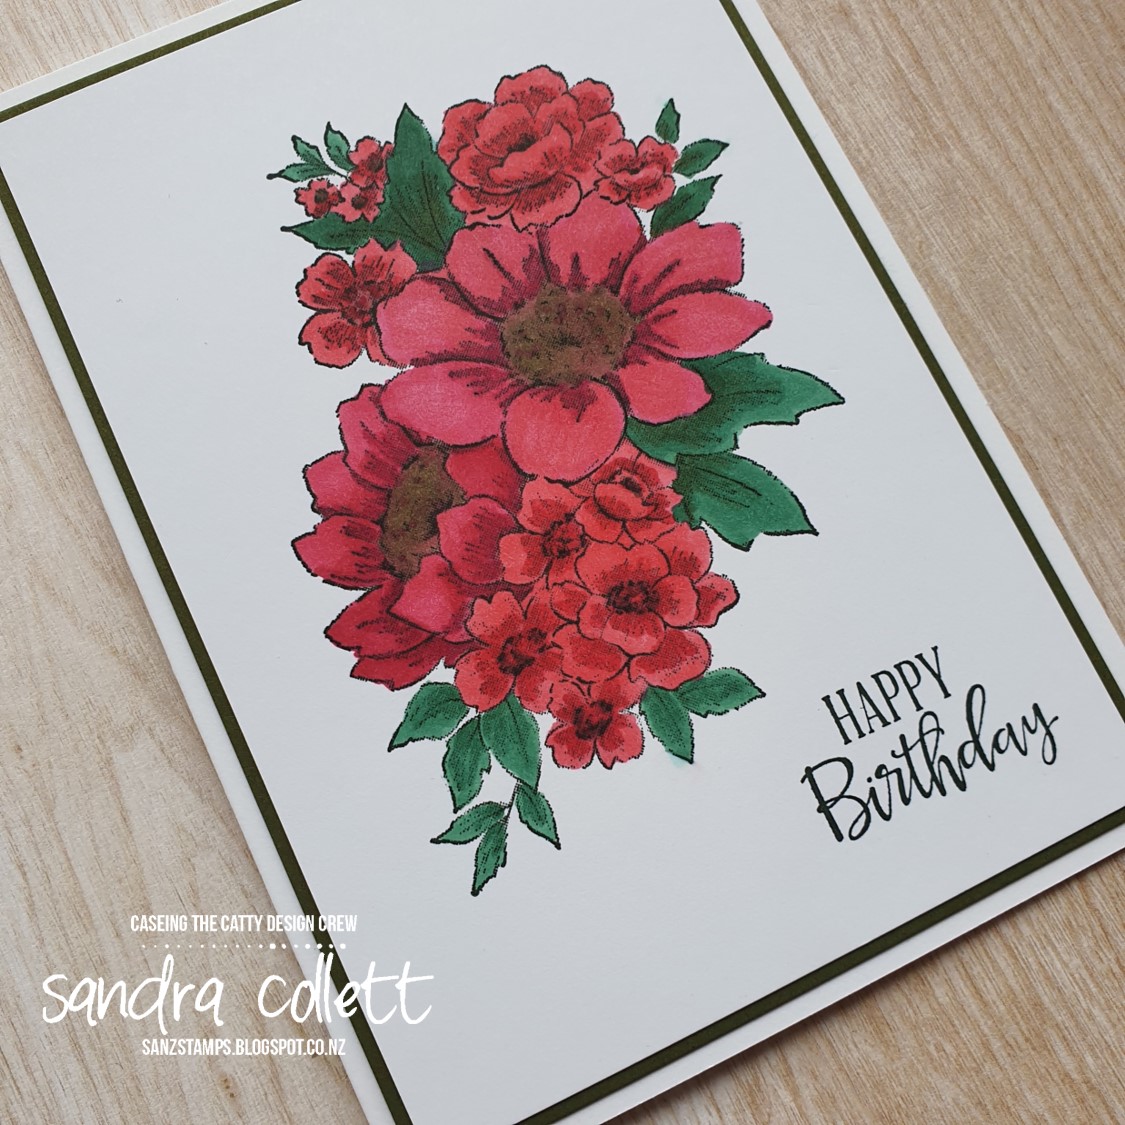
I've started by die-cutting circles using the Beautiful Shapes Dies from Texture Chic Specialty DSP and Gold & Rose Metallic Specialty Paper. 

I chose my background of Abigail Rose DSP and added a panel to a base of Thick Very Vanilla cardstock. Before adhering the Abigail Rose panel to the base I added the outside group of circles. I didn't want raised joins, and to get around that I chomped again using the same size circle die where required then butted each die cut up to the other when adhering. Once the outer circles were in place, I trimmed them and added the mat to the base card.

I then filled the inside layers given my card was a standard size and the one I cased was a slimmer card. To get around the big gap that may have been left,  I cut a larger circle from Evening Evergreen cardstock and popped the greeting from Peaceful Moments onto that. I am on a mission to use up some of my ribbon stash and for this I used a (retired) Daffodil Delight sheer ribbon behind the greeting, which was then popped onto the card using Stampin' Dimensionals.


As you can see, the Metallic Specialty paper is quite hard to photograph but those circles non Texture Chic are all the same colour.


Do you see a Glitter project you think you'd like to CASE? Please do, and play along before next Sunday evening by posting a photo of your project to our page using the link over on the right.


Next up we have Michelle and her lovely take on Christmas:


Sunday, 21 August 2022

#CTC383 - CASE Artistic Expression Section


CASE the Artisic Expression Section of the Annual Catalogue - Pages 90 - 119:

I was drawn to the card in the centre of the picture on Page 103:


I white heat embossed the floral image from Quiet Meadow onto Vellum then fussy cut it out. 

A scrap of Sun Prints DSP caught my eye and I chose that instead of the stamped piece in the CASE card, I cut a full size panel of Gray Granite and layered a strip of Parakeet Party cardstock and the Sun Print DSP strip onto it. I adhered the embossed foliage to the left hand edge and added the panel to a base of Night of Navy cardstock. The greeting is from Peaceful Moments, stamped in Night of Navy ink onto Petal Pink cardstock before trimming and adhering in place. To finish I've used some Polished Dots.


This would be an easy card to replicate in many different colour combinations.

What catches your eye in the Artistic Expression section of the Annual Catalogue? CASE a card and post a photo on our Facebook page before next Sunday evening for us to enjoy - you can use the link over on the right if you need to.

Next on the hop we have our friend Tina and her lovely vibrant card:

Sunday, 7 August 2022

#CTC381 CASE Boughs of Holly Suite


CASE the Boughs of Holly Suite - page 24 of the July - December Mini Catalogue: 


I've chosen to CASE the colours of the DSP in this suite: Cherry Cobbler, Real Red, Poppy Parade, Mossy Meadow, Evening Evergreen and Shaded Spruce.

I've stamped the largest image from Blessings of Home using Evening Evergreen onto Basic White cardstock. 

I've coloured this image using Stampin' Blends in the remaining colours using both light and dark options and mixing the colour combos to give differing results.. 

The greeting is from Peaceful Moments stamped using Evening Evergreen ink. 

I've matted the coloured image with Mossy Meadow cardstock and attached it to a base of Thick Basic White. 


Simple Stamping - Stamps, Ink, Cardstock (and Blends).


We hope to see you play along with the challenge this week. Check out Page 24 of the July-December mini catalogue. Create your card and post a photo to our Facebook page using the link over on the right before next Sunday evening.

Next on the hop we have Michelle with her fabulous Birthday card:

Sunday, 15 May 2022

#CTC369 CASE a Blending Brush Technique


CASE a Blending Brush Technique project:

I've used the card on the bottom right of Page 65:


My base card is Highland Heather. Using the Butterflies & Flowers Layering Decorative Masks, Highland Heather ink pad and Blending Brushes. I've created my background on Basic White cardstock, trimmed and attached it to the base.

The Peaceful Moments greeting is stamped in Granny Apple Green and diecut with one of the Rectangle Stitched Dies. After attaching that over to the right of the card I've finished with a few Iridescent Rhinestone Basic Jewels. 


I like how the colour of the greeting pops but it leaves the masking as the showcase of the card.


We hope you can play along with a Blending Brush Technique project this week. Post your card to our Facebook page using the link over on the right before next Sunday evening.

Next up we have our friend Monique:

Sunday, 3 October 2021

CTC338 - CASE Sketch on Pg 34 of Mini


This sketch on Page 34 of the August - December Mini Catalogue:


In a simple format:
I've used a base of Thick Basic White cut lengthwise and folded in half for my base. 

Next I've worked out my top layer also in Basic White. I've diecut a panel of little flowers using the Hydrangea Dies. I've heat embossed a hydrangea flower from Hydrangea Haven and a greeting from Peaceful Moments with gold embossing powder onto Basic White cardstock. The flower was diecut with the Hydrangea Dies and the greeting was trimmed to be a strip to fit. 

My mat is Evening Evergreen and I've snuck a diecut from the Layering Circles to mat my feature diecut onto. I've cut Gold strips from the Gold & Rose Metallic Specialty Paper to add accent from my perception of the CASE card.


I've added a few of the diecut tiny white flowers and popped a Gold Metallic Pearl in the centre. I've added a piece of Baker's Twine tied in a bow around the centre of the card, focusing the bow to the front. Happily sending this off to my Aunty and Uncle to celebrate their 50th Wedding Anniversary. 

Can't wait to see your take of the sketch. Pop your photo up on our Facebook page using the link over on the right.

Next on the hop we have Monique!


Sunday, 25 April 2021

#CTC315 CASE a Kit


CASE a Kit - Retiring Annual Catalogue or January-June Mini Catalogue:


I've chosen the January-June Mini Catalogue and the You Are Amazing Project Kit on Page 7:


I chose the Dandy Garden DSP for my starting point and ended up CASEing all the cards in the kit picture.


Onto a base of Thick Basic White a full panel of DSP, a panel of Mossy Meadow cardstock, a strip of Calypso Coral banner cut at each end, then a Tasteful Labels diecut from Blackberry Bliss and a Stitched Shapes Circle stamped with a greeting from Handsomely Suited in Calypso Coral ink. The bow is retired Old Olive Baker's Twine.


Onto a base of Thick Basic White a full panel of DSP, a strip of contrasting DSP, a banner of Vellum Cardstock with the retired Old Olive Baker's Twine wrapped twice around and then tied off with a bow, a Stitched Shapes square from Mossy Meadow and a Stitched Shapes square of Basic White with a greeting from Peaceful Moments stamped with Night of Navy ink.


Base of Bumblebee, panel of DSP matted with Basic White. Stitched Shapes circles diecut from Blackberry Bliss and Calypso Coral. Greeting stamped in Mossy Meadow using Peaceful Moments and banner cut at each end, same retired Old Olive Baker's Twine bow.


Onto a base of Thick Basic White a full panel of DSP,  a rectangle of Vellum cardstock snipped at the top corners to replicate a tag, a panel of DSP, a greeting from Happiest of Birthdays stamped onto Basic White in Blackberry Bliss and diecut with the Tasteful Labels die then matted with Blackberry Bliss and another retired Old Olive Baker's Twine bow.


I think now that the planning has been done, this set will be easy to replicate in all sorts of DSP and would make a great gift set.

We hope you'll play along this week and add your project to our Facebook page before next Sunday evening.

Next up we have Marvi's lovely Mum, Peta and her cute pet cards:

Saturday, 27 March 2021

Social Stamping - In Colours


Not sure where the month has gone, but we're back Social Stamping with Kelly Kent and friends with our theme this month using "In Colours". 

Given the 2019-2021 In Colours are soon to retire, I thought I would use that set today, but I will share a card I've made previously for a Challenge using the 2020-2022 In Colours further down.

Using Pieced Blooms Dies, I've cut several leaves from Pretty Peacock, and petals in Purple Posy, Rococo Rose and Seaside Spray with some circle centres from Terracotta Tile. To make it easy to put them together I stuck them all to Adhesive sheet and then randomly constructed my flowers.

I've used a base of Thick Basic White and a top layer of Basic White which I embossed with the (sadly) soon to be retired Subtle 3D Embossing Folder. I've layered the embossed piece onto a mat of Terracotta Tile and adhered it to the base card. Then I've popped all the flowers and leaves into place, it's a bit busy and not colours I'd usually use for flowers. 

Next I've added a greeting from Peaceful Moments in Pretty Peacock and diecut with another of the Pieced Blooms dies. A couple of flowers added to the corner and popped onto the card with Stampin' Dimensionals. To finish I've popped a few of the clear Flowers for Every Season Gems into place.


The layers of flowers are balanced with the depth of the greeting:


As mentioned, I have used the 2020-2022 In Colours for a Challenge some time ago and I shall share it here for a totally different way to use the In-colours. If you want further detail, you can find it on my original post.

 I'm looking forward to seeing everyone's ideas today.

Next up we're hopping over to Mandy:


If you get lost along the way, you'll find all the participants back on Kelly's post here. Thanks again Kelly for your time and energy organising our Social Stamping get togethers.

Sunday, 18 October 2020

#CTC290 CASE the Colours of Plaid Tidings DSP

CASE the Colours of Plaid Tidings DSP: Basic Black, Blackberry Bliss, Bumblebee, Cajun Craze, Cherry Cobbler, Cinnamon Cider, Crumb Cake, Mango Melody, Melon Mambo, Misty Moonlight, Pretty Peacock, Pumpkin Pie, Rich Razzleberry, Seaside Spray, Shaded Spruce, Whisper White - that's a lot of colour, but don't worry, you don’t have to use them all!


I've managed to use nine I think. I've diecut using the Well Written Dies, Shaded Spruce leaves, Melon Mambo and Blackberry Bliss flowers, Bumblebee & Pumpkin Pie butterflies and a Misty Moonlight bird. Behind each flower is a tiny square of Bumblebee cardstock. And for the butterflies I've swapped the negative pieces. I've adhered them all to a top layer of Crumb Cake which was embossed with the Old World Paper 3D Embossing Folder and matted onto Whisper White cardstock.

I've used Stampin' Dimensionals to attach this layer to my base card of Mango Melody. The greeting is from Peaceful Moments using Blackberry Bliss ink onto Bumblebee cardstock and punched with the Lovely Labels Pick a Punch. To help it to pop a little I've used the Rectangular Postage Stamp punch and Whisper White cardstock to pop behind my greeting then adhered it to the top layer. I've added some of the Flowers for Every Season gems and finished by splashing around some Wink of Stella.


As you can see, what I should have been doing was mowing the lawns, but they'll still be there tomorrow! Here's the Wink of Stella picture:


There's such a range of colours to pick from this week, hopefully you'll be inspired to play along. Make your card and post the picture to our Facebook page by next Sunday evening using the link over on the right.

Please continue on the hop to visit Julia and her gorgeous scrapbook page:

Sunday, 26 July 2020

#CTC278 CASE your Favourite 2020-21 Annual Catty Project


Pretty much open book this week from the annual catalogue!


For me - the Peonies have been calling and I stopped at page 82 top left...


After I chose my card, I wanted to swap the colours out, inspired by peonies that I grow in my garden, although they are only just thinking about appearing, I hope they don't get too excited until the frost danger has passed.

I started by die cutting the pieces for the peony flower and leaves from Whisper White using the.Peony dies. I then used So Saffron and Flirty Flamingo in that order to wash colour onto the pieces for the flower without going over them too much or being too fussy. While they were still a little damp I popped them into the Old World Paper 3D embossing folder and used a bit of tissue over the top to help absorb any moisture before running them through my embossing machine. Instant texture! (I used this once before, but did have to be careful as without misting the feature layer can tear easily)

I then coloured the leaf pieces in the same way with my Old Olive ink pad and when dry adhered them in order. Then I placed them behind the flower and glued them in place.

I've used So Saffron cardstock as a base card and stamped off the large peony flower from the Prized Peony stamp set with Gray Granite ink around the card as per the original CASE card. I've cut a piece of Peony Garden DSP but reversed the colours from the CASE. I chose one with a lot of white in the background. Next I cut a piece of Gray Granite cardstock with the Painted Labels dies. It was smaller than I wanted, so I had to bring in the trick of cutting over the edge of the board and then realigning for the other side, a little bit of fuss for a shape that suited me.

I've heat embossed the birthday greeting from Peaceful Moments onto Old Olive cardstock with White embossing powder and trimmed it to fit the width of my DSP. I've also diecut an edging from Gray Granite using the Peony dies border and adhered behind the bottom of the greeting.


The texture is hard to capture by photo however, after placing the flower, leaves and greeting on Stampin' Dimensionals - you will have to trust me, it's there!.


Here's my inspo... I grow other colours, but these were the closest.


Love to see your favourite project from the catalogue, feel free to add it to our Facebook page using the link over on the right. Meanwhile, please visit Judy to see what I'm sure will be another fabulous creation!