Showing posts with label Tasteful Labels dies. Show all posts

Sunday, 27 February 2022

#CTC358 CASE an Embossed Project


CASE an Embossed Project featuring either type of embossing and from any of the current catalogues.


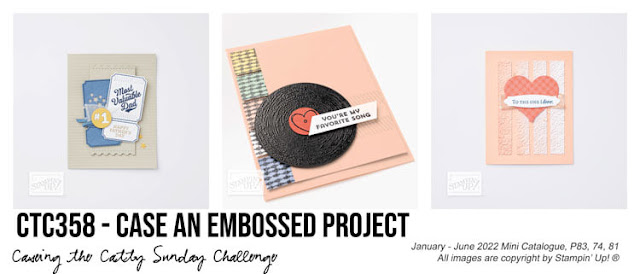
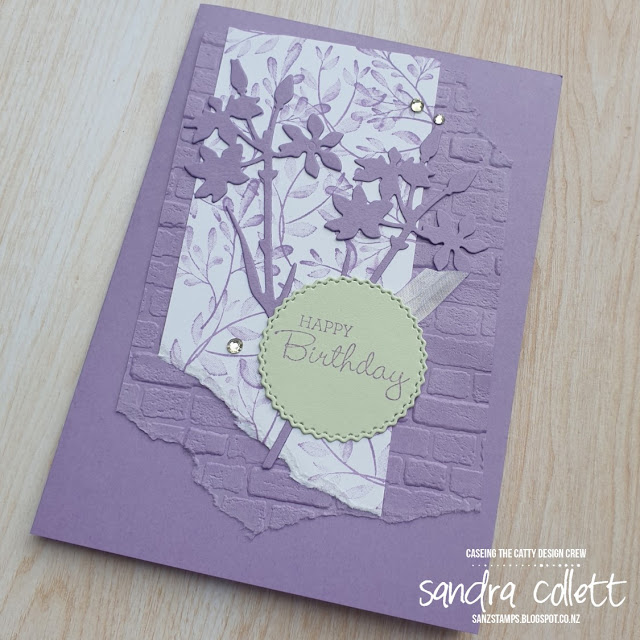
Check out the Mini Catalogue Page 55 and the card on the right which was my choice.


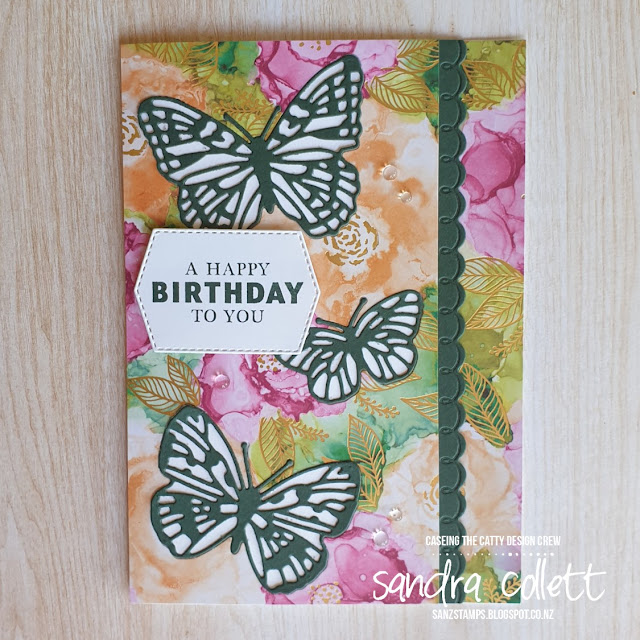
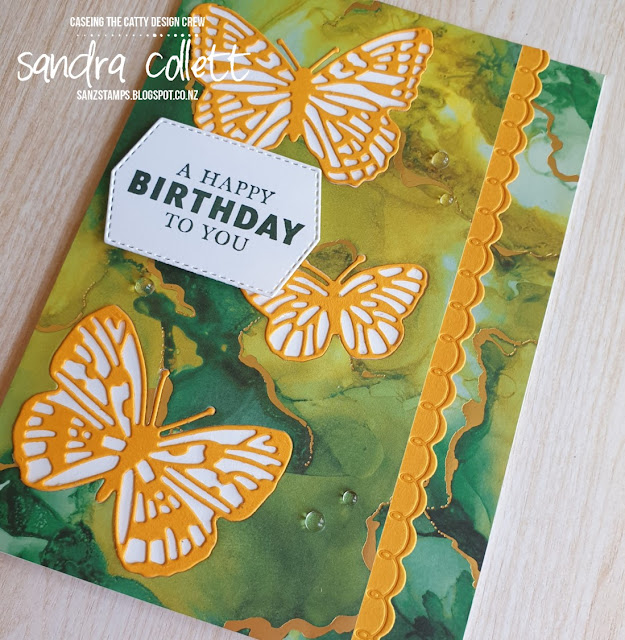
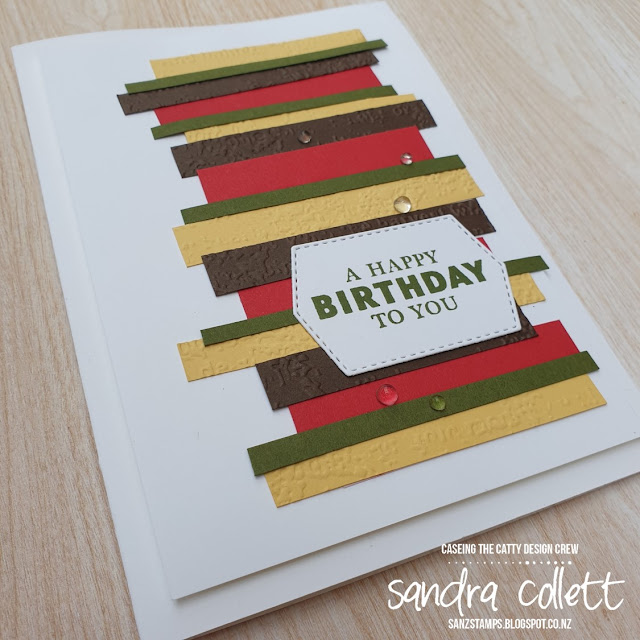
I've chosen the same base card of Thick Basic White and top layer of Basic White. I've gone to my scrap folder and chosen four colours which I thought looked ok together - Real Red, Early Espresso, Mossy Meadow and So Saffron. 

If you look closely at the CASE card, I thought two of the colours were embossed and two were not so that's what I went with. I cut strips roughly the same as what I thought the card above and then a piece of scrap was used as a placement card to adhere my strips onto. I've popped the So Saffron and Early Espresso strips into the Timeworn Type 3D Embossing folder and embossed them. I had wide strips of differing widths and then after adhering them in place, I've snipped the ends off to suit. When I was happy I added this to the top mat. 

The greeting is from Handsomely Suited, stamped with Mossy Meadow ink onto Basic White and  diecut with the Tasteful Labels dies. This was adhered onto to strip panel and the whole mat was attached in place with Stampin' Dimensionals. I went with the (retired) Flowers for Every Season Gems as my bling.


The crew look forward to seeing which embossed project you choose to CASE. Post it to our Facebook page using the link over on the right before next Sunday evening.


Next on the hop we are off to check out Tina's stunning card:

Sunday, 20 February 2022

#CTC357 SAB Pg 6 Sketch


We are CASEing the Sketch top right of Page 6.

Here's the simplified sketch:

I cut a panel of Daffodil Delight the width of my card and a panel of the script from Vellum Layering Designs a little longer and adhered by sticking it to the back of the panel and wrapping it tightly around and then adhering the other edge so the sides are basically open but I didn't want to worry about adhesive showing through the vellum.

I've cut two strips of Mango Melody and diecut with the edging die from Peony dies then glued these behind the panel and attached it all to my base card. Next I've diecut a shape with the Tasteful Labels dies out of Smokey Slate cardstock and embossed it with Timeworn Type 3D Embossing folder and popped that lower on the panel. The Daffodil was pieced together using Daffodil Dies, Daffodil Delight, Mango Melody and Old Olive Cardstock. 

I've stamped the greeting from Blessings of Home in Night of Navy ink onto Basic white and popped one end against the edge of my card and stuck the other just under my daffodil stem. To finish I've used the little self adhesive Brushed Brass Butterflies.


Playing with some of the product from the new mini catalogue.


We look forward to seeing your take on the sketch and posting the photo to our Facebook page using the link over on the right. Just a few simple questions to join the group first, answer them and you're all set. 

Next up we have Kathryn and her cute card:

Sunday, 30 January 2022

#CTC354 CASE Abstract Beauty Suite


CASE the Abstract Beauty Suite on pages 48-57 of the January-June Mini Catalogue:

I've chosen the Slimline Butterfly card on Page 52:


I didn't make a Slimline card though, just my usual half A4 but I used this picture for inspiration. I've started with a base of Thick Basic White and cut a piece of Expressions in Ink Specialty DSP to the full size of the card. I've then sliced it 3/4" from the side and taken the same amount off the front of the card base. 

I've cut three butterflies out of the DSP using the Brilliant Wings Dies and popped them aside for another project. I've used the CASE card idea of a contrasting edging and cut a piece of Evening Evergreen cardstock with the edging from Peony Dies. I've adhered the edge to the DSP and then attached the DSP panel to the front of the card. The 3/4" of DSP has been added to the inside edge of the card so it looks like it's all one. I've diecut the same three butterflies out of Evening Evergreen cardstock and adhered them into the blanks on the front of the card. The greeting is from Handsomely Suited and stamped in Evening Evergreen ink onto Basic White cardstock then diecut with a Tasteful Labels die and attached it to the card with Stampin' Dimensionals.


I've added some (retired) Flowers for Every Season gems to finish.


At the time I couldn't decide which piece of DSP I wanted to use, so ended up making two cards.


This time the contrast colour was Mango Melody but I have kept with the Evening Evergreen greeting.


I can't decide if I've a favourite or not - I keep going from one to the other but they both look so pretty with the gold shimmering in the background. Let me know which one you prefer.


We hope you'll join us CASEing the Catty this week. Post your project to our Facebook page using the link over on the right before next Sunday evening. Winner announced Monday evening.

Next on the hop we have the lovely Rebecca and her fun Black & White with a pop of colour card!

Sunday, 9 January 2022

#CTC351 Sale-a-bration


 CASE the new Sale-a-bration Catalogue

I've chosen the card on the far right of page 17:

I started with a base card of Highland Heather and cut a mat smaller than the card which I spritzed, crumpled and tore before embossing with the Brick & Mortar 3D Embossing Folder.

I used Eden's Garden images to stamp the foliage in Highland Heather onto a panel of Basic White card which was also torn at the bottom edge. I've adhered these to the base card and added foliage diecut in Highland Heather cardstock with Meadow Dies. 

Soft Sea Foarm was my chosen contrast cardstock to diecut the circle shape with Tasteful Labels dies and the Pansy Patch greeting has been stamped with Highland Heather ink. A piece of White Crinkled Seam Binding was added behind the greeting.


The card has a few rhinestones to finish. 


We look forward to seeing your project added to our Facebook page = you can use the link over on the right to find it. 

Next on the hop we have the lovely Rebecca:

Sunday, 19 December 2021

#CTC349 CASE the Mini Catalogue


CASE the July-December Mini Catalogue before it retires:


This image above is from Page 24 and I've CASED the card top middle.

I've used the Stamparatus to repeat stamp the ornament image from Whimsical Trees so they are not as staggered as the original but it suited what I wanted. I've stamped the images using Basic Gray ink and coloured the ornaments with Stampin' Blends. 

Instead of a landscape card I've cut my A4 sheet of cardstock in half lengthways to create a tent card then added my panel to it. I've also added strips of Gold Metallic Specialty Paper. The greeting has been diecut using Tasteful Labels dies and added above the panel with Metallic Pearls to finish.

Quick and easy but perfect for mass producing or adding to that pile of cards I still need to write in - they'll be late again people!!


We hope you'll play along with our last challenge from this catalogue and for the year! You have until 1 January to post your card to our Facebook Challenge page using the link over on the right.

Before you go though - please continue on the hop and check out the fun project Julia has to share - looks like she's going to be spoiling some special people:

Sunday, 17 October 2021

#CTC340 CASE a Bundle from Pgs 65-71


CASE a Bundle from Pages 65-71 of the Mini Catalogue


I've chosen the card on the bottom right of Page 70:

Instead of a Halloween theme, I've changed it to Christmas.

I've started with a base of Soft Succulent cardstock. I've trimmed a piece of Evening Evergreen for the top layer and cut the same size piece of Tidings of Christmas DSP. Before adding it to the mat, I've cut a small triangle off the lower corner and slightly larger off the top opposite corner.

My tag is made with the Stockings Dies and Cherry Cobbler cardstock. Texture was added with the Timeworn Type 3D Embossing folder. Next I've added a tab of Basic Black cardstock folded in half and stapled it in place. The tree is diecut with the Christmas Trees Dies from Evening Evergreen. The holly was stamped with Evening Evergreen ink and coloured with Stampin' Blends before being diecut with the same Christmas Tree dies. 

The greeting is from Whimsical Trees stamped in Evening Evergreen ink onto Soft Succulent cardstock.then diecut with the Tasteful Labels dies. 


This was possibly my least favourite DSP out of the pack but I feel it works well for this background as it is quite simple. I could have used two of any of the smaller trees but opted for one larger one as my tag was slimmer and it stayed in balance


What's your favourite bundle from the mini catalogue? We hope you'll post a card to our Facebook page using the link over on the right before next Sunday evening!

Next on the hop we have our friend Monique:

Sunday, 5 September 2021

#CTC334 CASE the Gingerbread & Peppermint Suite


CASE the Gingerbread and Peppermint Suite:


I've used the image top left of the photo above.

I chose one of the Black and White sheets of Pattern Party DSP for my background but to bring in a bit more colour, I've used a Flirty Flamingo Stampin' Marker and a ruler, and placed the ruler on each black line and drew a coloured line next to it, horizontally and vertically..


I added the DSP to the Basic White cardbase. Instead of the foil panel in the CASEd card, I've used a piece of Basic White and embossed it with the Painted Texture 3D folder which I mounted crooked on a same size piece of Flirty Flamingo cardstock. I've punched out six Basic White blanks using the Medium Daisy Punch. and set up my Stamparatus with a scrap piece of card having a shape cut out to become my template. I've added each white daisy into the negative space and stamped it with the medium daisy from Daisy Lane in Flirty Flamingo ink. These were adhered in pairs and attached using Stampin' Dimensionals. 

The ribbon is White Crinkle Seam Binding which I've held against the Flirty Flamingo ink pad with a tissue and pulled the ribbon across the ink, then left it to dry. The greeting is from Quiet Meadow in Black Memento ink of Basic White card. I've used the Tasteful Labels dies to cut the shape out and then I've done the same with a scrap of Flirty Flamingo and trimmed around the stitched outer edge to create a frame for the greeting. The ribbon was attached behind the greeting and this was also added to the card with Stampin' Dimensionals.


This is such a versatile layout and would lend itself to many different themes.


What catches your eye in the Gingerbread and Peppermint Suite? We would love to see your CASEd project added to our Facebook page before next Sunday evening using the link over on the right.

Next on the hop we have Rebecca!

Sunday, 1 August 2021

#CTC329 CASE Mini Catalogue Cover


CASE the Cover of the New Mini Catalogue


I used the image in the centre and rotated it 180 degrees for my layout inspiration.

Onto a base of Soft Suede cardstock, I've added a faux ribbon using a strip of Highland Heather cardstock mounted onto a strip of Basic White. The Hand-Penned DSP was used to diecut with a Tasteful Labels die, but only to half the width of the die, then the other half was cut from the far end of the DSP to give an elongated diecut. This was repeated with a shorter piece of Soft Sea Foam cardstock for the next layer. Another piece of Hand-Penned DSP with another Tasteful Labels die, and the final layer was diecut from the same set after stamping the greeting from Handsomely Suited in Soft Suede ink onto Basic White cardstock.

The flowers, in Pale Papaya, leaves in Garden Green and bow in Highland Heather and Basic White were diecut using the Pierced Blooms Dies and roughly adhered to replicate the original.


I've finished by adding a knot around the bow with White Baker's Twine and a few of the tiny flowers from the scraps on my bench.


Do be sure to check out all the other ideas from the crew - amazing diversity in projects! We look forward to seeing your creation - be sure to add it to our Facebook page using the link over on the right. Next on the hop is the lovely Judy:

Sunday, 11 July 2021

#CTC326 CASE a Layout and Step It Up


This week we are CASEing a Layout and Stepping It Up:

The card on the left of Page 56 was my choice:


The basic card is a base of Granny Apple Green cardstock. I've added a Basic White shape using the Tasteful Labels Dies. Attached to this was a piece of Expressions in Ink Specialty DSP.

A turtle shape was stamped in Black Memento ink onto Basic White cardstock and a shell of Granny Apple Green was added. This was punched out with the Turtle Punch. I inked the bird in Pale Papaya and placed the turtle where I wanted it to end then removed it to stamp the bird in place before adhering the turle. The greeting from Turtle Friends was stamped in Granny Apple Green onto Pale Papaya cardstock and attached to the card with a Baker's Twine bow to finish.


To step it up, I've added another layer of Granny Apple Green cardstock to the base after embossing it with the Painted Texture 3D Embossing Folder. I've also embossed the Tasted Labels diecut after it has been stamped with the bird using Tasteful Textile 3D Embossing Folder, matted the greeting with Whisper White, switched out the Baker's Twine bow for a White Crinkled Seam Binding double bow and added some Sequins for Everything


Subtle differences creating texture:


And the two cards side by side:


We look forward to seeing what you choose to Step It Up. Add your project to our Facebook page using the link over on the right before next Sunday evening.

Can't wait to see what Monique has for us Next: