Showing posts with label Stampin' Blends. Show all posts

Sunday, 7 August 2022

#CTC381 CASE Boughs of Holly Suite


CASE the Boughs of Holly Suite - page 24 of the July - December Mini Catalogue: 


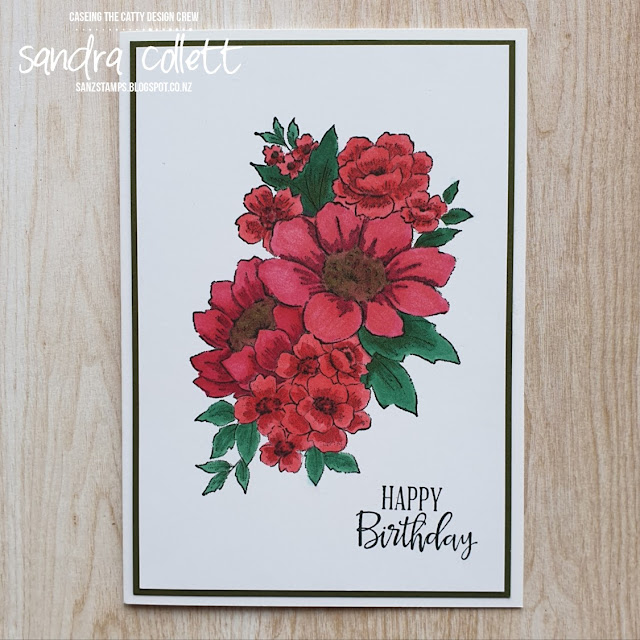
I've chosen to CASE the colours of the DSP in this suite: Cherry Cobbler, Real Red, Poppy Parade, Mossy Meadow, Evening Evergreen and Shaded Spruce.

I've stamped the largest image from Blessings of Home using Evening Evergreen onto Basic White cardstock. 

I've coloured this image using Stampin' Blends in the remaining colours using both light and dark options and mixing the colour combos to give differing results.. 

The greeting is from Peaceful Moments stamped using Evening Evergreen ink. 

I've matted the coloured image with Mossy Meadow cardstock and attached it to a base of Thick Basic White. 


Simple Stamping - Stamps, Ink, Cardstock (and Blends).


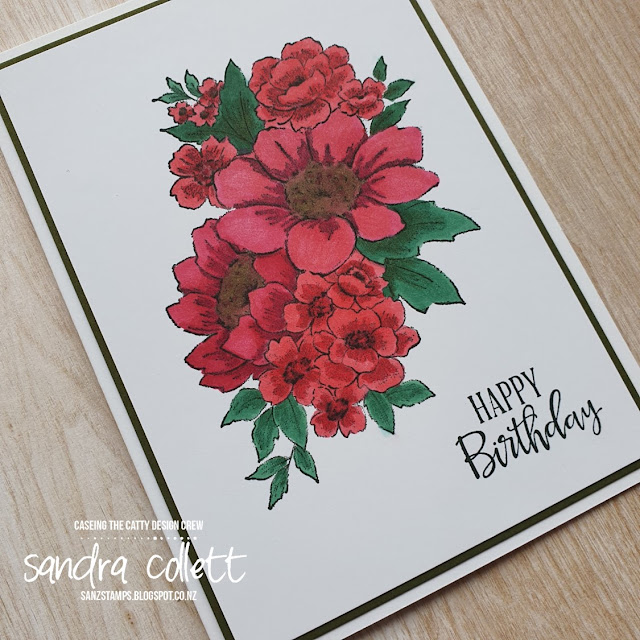
We hope to see you play along with the challenge this week. Check out Page 24 of the July-December mini catalogue. Create your card and post a photo to our Facebook page using the link over on the right before next Sunday evening.

Next on the hop we have Michelle with her fabulous Birthday card:

Sunday, 1 November 2020

#CTC292 CASE the Layout on Page 159

This is the layout we are CASEing:


Or there's a sketch if you prefer:

I've used the Menagerie Mix-up stamp set to create some critters, although I will confess I didn't order the dies. Onto Whisper White, I've used Gray Granite ink, and stamped a piglet and a mouse near the bottom of the card. I've coloured them in with Stampin' Blends and using the Granny Apple Green ink pad, I've added a flower to the mouse, then a package to the piglet and a scrap of DSP. The flower was coloured with the Blends and the package fussy cut and glued to the shape.

Next I've wrapped some linen thread around the cardstock and added a bow. I've used Flirty Flamingo cardstock to punch a Rectangular Postage Stamp shape which has been shifted from the middle of the picture so the critters weren't covered and added a greeting using has Happiest of Birthdays in Gray Granite ink onto Whisper White cardstock.

I've used Flirty Flamingo as my card base and added a mat of Flirty Flamingo embossed with the Tin Tile 3D Embossing Folder.

I've adhered the focal panel with Stampin' Dimensionals and added a few of the Flowers for Every Season gems.


Apologies, but I have to show off my beautiful peony I showcased my card onto  (I think it's an Herbaceous Peony, but don't have a name and need to do some research). 


We'd love you to play along, post your project to our Facebook page using the link over on the right by next Sunday evening. Next up we have Peta and her gorgeous Xmas card:

Saturday, 31 October 2020

Social Stamping - Get Better Soon


Joining the Social Stamping monthly blog hop with Kelly Kent and friends and our theme this month is 'Get Better Soon'! 

I've seen some fun cards recently using Stampin' Blends and Window Sheet (credit to Michelle Jutrisa). However, I've done things a little differently. Anybody else like me and still have a stash of Glossy cardstock? 

I added scribbles of Stampin' Blends onto Window Sheet and spritzed with isopropyl alcohol then turned the sheet over and pressed it onto the glossy card. I added colour as I saw fit and when it was a little wet from the alcohol you could smoosh it around and watch the image alter.I was rushing a little so decided to go with what I had, and because it came together so quickly, I've used them all. 


I set my Stamparatus up with an image and greeting from Dandelion Wishes. I love this set for resist embossing, but decided to have a change today. I've inked two with Bermuda Ink, the greeting didn't come out as well I'd like, but when I used Misty Moonlight for the other two, it must be that there wasn't quite enough ink as it really grabbed, although I think some of the little seeds may have not inked, but I was still happy with the result. I did have to set these aside while I made a cuppa just to make sure the ink had dried. I could have sped it up with the heat gun but didn't want to risk warping the lovely smooth card.


I've used mats of Bermuda Bay and Pear Pizzazz and mounted all onto thick Whisper White card bases using Stampin' Dimensionals


The greeting is perfect to send someone who's feeling a bit under the weather, although it lends itself to a wider audience as well.


I've used three Stampin' Blends colours per card, although sometimes where the colour merged it looked like another colour had been brought in. I think I like this last one the most;


Thanks for stopping by, please continue on the hop to visit Michelle's fabulous project:


If you get lost along the way, click here to take you to the main page and a full list of participants.

Sunday, 23 August 2020

#CTC282 CASE your Favourite Mini Catalogue Bundle

The bundles can be found throughout the catalogue with a summary on pages 71-75.

I've chosen to loosely adapt a card using the Have a Hoot bundle on Page 62:

I've used a base of thick Whisper White cardstock. I've stamped the Have a Hoot family on the branch using Early Espresso ink onto another piece of Whisper White cardstock. Because we are a family of three, I've masked off the littlest owl in the picture. I've coloured the image with Stampin' Blends. My branch needed extending to meet the frame and I used an Early Espresso marker to do so.

I've cut a piece of the returning fave, Feels Like Frost Specialty DSP the same size as the card front and cut a window using the Tasteful Labels dies. I chose this DSP because the colours in it are more like we will be experiencing at Christmas time - bright and summery (we hope!). I've adhered the layers in place and added a greeting from Have a Hoot stamped in Early Espresso onto Whisper White cardstock and trimmed using the Lovely Labels Pick a Punch. 

I've finished off with a few of the Flowers for Every Season Gems. The greeting on the inside is from the same set - "From Owl of Us".

We hope to see you play along. You have until next Sunday evening to create your project.and add the photo to our Facebook page using the link over on the right.

Next on the hop we have Tina:

Sunday, 16 August 2020

#CTC281 CASE from Annual Catalogue Punch Bundle Section

 
CASEing the Punch Bundle Section, pages 168-169:

This picture also happens to use the card I've CASEd - the top picture, which is the third card down on page 168.

I don't own the Field of Flowers punch but the card reminded me instantly of the Painted Poppies I'd used recently so I reached for that set to begin. I stamped the poppies onto Whisper White with Old Olive Ink. To resemble California wild poppies I've coloured with Dark Mango Melody and Dark Pumpkin Pie Stampin' Blends. 

The greeting from Special Someone is heat embossed with White Embossing powder onto Pumpkin Pie cardstock. I've trimmed it to 1/2" thick and instead of a banner, I've used the Lovely Labels Pick a Punch to give some interest to one side of the greeting. I've adhered this panel onto a diecut of Ornate Layers dies using Old Olive cardstock. I've trimmed it straight as per the CASEd card and popped it all on Stampin' Dimensionals. 

Next I've stamped the butterflies from Special Someone in Old Olive - the CASE used four flying critters, but I had to add an extra. To finish it all off, I've used Wink of Stella on both the butterflies and the flowers.

I've even managed to give a bit of inside love to this card using another image from Painted Poppies and the same Blends as above along with Old Olive and again finished with Wink of Stella:

This may give a better idea of the Wink of Stella effect:

If you like these colours, you may be interested in the Box of Sunshine Paper Pumpkin kit which is available from your demonstrator now. Check out this blog post for some different ideas using the supplies. 

Next up we have our lovely Rebecca:

We hope to see you play along with the challenge this week. You have until next Sunday evening and you can post your picture to our Facebook page using the link over on the right.

Tuesday, 26 November 2019

#Onstage2019 Country Club Suite - Part 1

Hi everyone

As promised, I'm going to show you the samples I presented in Perth at the Stampin' Up! Onstage Local event held on 16 November 2019.

I was delighted to present the Country Club suite - perfect for the golfers in your life!


There are 8 Cling Mounts stamps in the Clubhouse stamp set that coordinate with a set of 14 Golf Club dies, 6 of which have an embossed element to them.

The DSP has a plaid or argyle pattern on one side and golfing images on the reverse. the white one at the end is actually 12 line art images which you can trim to 4" x 3" and colour with your favourite medium. The coordinating colours are Basic Black, Crushed Curry, Garden Green, Night of Navy, Poppy Parade and Whisper White.

There are also a set of 3 sheets of wooden elements, a twine combo pack and a 3D Embossing folder - Absolutely Argyle.

My presentation involving some 'live' stamping was based around:

The Beginner Stamper - (stamps, ink and paper) with, in my case, some stress relief via colouring with watercolour pencils, and if desired using an aqua painter

The Casual Stamper - a little more than the beginner but not necessarily a lot of equipment - here I used the Stampin' Markers direct to the rubber stamp to achieve the colour, adding a little DSP and using a punch for the inside greeting, with a little more DSP

The Avid Stamper - they tend to have a lot more equipment. I've used the Garden Green ink pad to swipe my Absolutely Argyle Embossing folder with before embossing the Crushed Curry cardstock. I've coloured the same image used in the other cards with Stampin' Blends and die cut the shape, along with a few other pieces. The shield has been turned sideways to become my putting green and a wooden flag embellishment also coloured with Stampin' Blends was added. The greeting has been heat embossed with Black powder. On the inside I've used Stitched Rectangles to diecut the greeting to show how easily this set coordinates with supplies you may already own if you are the avid crafter, teamed up with some of the embossed diecuts from the set.


 Inside the Casual card 


 Inside the Avid card


I then proceeded to show some samples I had made with the items in the suite. I started with my Polo Shirt card. Originally I had wanted to make my card the shape of a polo shirt, but didn't like any of the designs I came up with and decided to zoom in on a photo of a shirt, and this is my take on it using Night of Navy cardstock, Country Club DSP and some of the round Country Club wooden elements as buttons. 

I covered the entire front with an argyle design from the DSP. Next I've embossed a couple of pieces of cardstock with Corrugated 3D EF for my collar along with a Stitched Rectangle for the placket a Layering Oval piece to become the top of the shirt. I painted button holes on with my Basic Black Stampin' Blend. I've dipped the buttons into Balmy Blue ink and added a layer of fine tip glue, but decided I didn't like the shine so wiped them off again before the glue set which took a bit of the ink away and I quite liked the look. My 'logo' is fussy cut from another sheet of DSP.


My next card was to show this suite is not just for the male golfers in your life. This is one of the images from the sheet of DSP cut to 4" x 3" and coloured with Stampin Blends. I have a base of Basic Black cardstock and a mat of Poppy Parade embossed with the 3D Absolutely Argyle EF. I've split the Basic Black twine and used only 3 strands with a bow added. I have a 4" x 3" mat of Basic Black angled with my picture adhered over the top. I've stamped the greeting and die cut with the embossed golf ball. Next was a coloured wooden element with Poppy Parade blends. I've stamped a greeting from Well Said in Poppy Parade and trimmed it to add to the wood. It now reads "You're the Best Thing About Today By Par". My final addition was a little wooden tee coloured with a Daffodil Delight Stampin' Blend.


Here's a little sneak peek of what's to come in the next couple of days - along with a rare picture of me!

Saturday, 8 December 2018

#CTC207 - Case Anything But a Card


Had me thinking this week, but I chose to stick with the Holiday Catalogue, even though you can case from either catalogue...


I've chosen the pizza box in the picture on page 34, top left:


I wonder if I got the brief wrong when I look at some of the crew pics - amazing!!  However, I needed a birthday card for Miss B, so went with it... I chose to rotate the orientation by -90 degrees and made use of the Daisy Delight stamp set and matching punch instead of the bows. I've used Stampin' Blends to colour the images and also to colour the Clear faceted gems. My base card is thick Whisper White, with a mat of Tranquil Tide and a top layer of the stunning Frosted Floral Specialty DSP.  Perennial Birthday greeting stamped in Tranquil Tide and punched using the Everyday Label punch then layered onto a rectangle of Tranquil Tide. All finished off with a Whisper White Baker's Twine bow. You can't tell but there was a little extra bling added by using my Fine-Tip Glue Pen to trace around some of the lines on the daisy petals.


Might be more clear in this one:


Happy Birthday Brianna!! Thanks for stopping by, please play along using the link to the right, and now hop over and see what Monique has created for the brief this week:

Sunday, 24 June 2018

#CTC184 - Delightfully Detailed


This week sees us CASEing a project from pages 38-51.


I've used the image in the top right of the photo on the left hand side of page 48:


Again I've CASEd the layout. Aren't those little critters cute? Unfortunately they don't relate to anything in our country, so in the meantime I'll admire what everyone else creates with them. 

I've gone back to my cute Granny image from You've Got Style in place of the critter. She's been coloured with Stampin' Blends and fussy cut. I've switched the DSP and embossed pieces around, to make the most of the beautiful Petal Promenade DSP. The card base is Mossy Meadow and the embossed section is Blushing Bride using the Basket Weave TIEF. The two largest Stitched Shapes circles were used to cut the frame in Calypso Coral. I've added a piece of retired Lemon Lime Twist mini striped ribbon and the greeting is from Painted Glass inked in Mossy Meadow.


The lady looks like she is off to celebrate at a garden party - least she'll be warm! What's a party without a little bling, not sure if you can see it, but I've broken out the Wink of Stella for the drink and jewellery:


Don't forget to play along, using the link over on the right sidebar. Let's now visit the lovely Rebecca and find out what she's created for us this week:

Sunday, 3 June 2018

#CTC181 - It's a New Catalogue


Yes! It's time to get excited about all the wonderful goodies in the new catalogue. We had free choice this week - anywhere from the 2018-19 catalogue. 


I had a coloured image waiting for inspiration, so instead of getting sidetracked flicking through the catalogue (as was starting to happen!), I stopped at page 42, and the delightful lady images from the set You've Got Style.  


I've used the returning colour Mint Macaron as my base, and embossed my top layer with the Quilt Top TIEF. I've changed the orientation to landscape and reversed the image placement using strips of Share What You Love Specialty DSP, banner cut as above and added over a vellum cardstock circle. I've switched greetings to the bubbly birthday one, and changed my lady - I think that was due to the change in our weather, I was kind of envious of how cosy she looks wrapped up in that coat! 

If you're wondering I used Stampin' Blends to colour her. Yes, she has been fussy cut, her fingers were the challenge, but I fell short at the thought of fussy cutting bubbles, and drew those onto the vellum.  She is finished off with gold from the metallic sequin assortment.  I just love these ladies, they just look like they're out for fun and have a story, or two, to share!


Why don't you make a card and share it with us based on something you find in the new catalogue, CASE (Copy and Selectively Edit) as you interpret it - we would love to see your work. Use the link over on the right. Time now to hop over and see what our lovely Fi has been up to: