Showing posts with label Layering Circles. Show all posts

Sunday, 20 November 2022

#CTC396 CASE a Watercolour Project


CASE a Watercolouring Project:

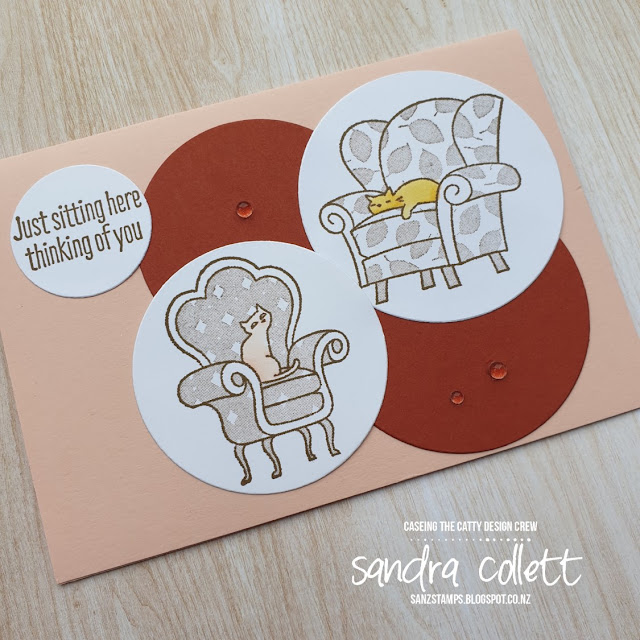
I've turned to Page 179 for my CASE of the hostess set on the top left:

I've stamped two images and a greeting from Sit Stay Relax using Soft Suede ink onto Basic White cardstock. These have been diecut using the Layering Circles Dies. The same dies were used with Cajun Craze cardstock and they were all adhered to a base of Petal Pink cardstock. Using my good old favourite (retired) Flowers for Every Season Gems to finish.

The original had another circle of colour but I like odd numbers so dropped it.


We hope to see you play along with the challenge this week and look forward to you sharing your project on our Facebook page, you can use the link over on the right if you need to.

Next up we are visiting Lauren:

Sunday, 24 July 2022

#CTC379 Sale-a-bration


We are returning to the Sale-a-bration catalogue for this week's challenge:


I've used the card on the right of Page 10:


Onto a base of Tahitian tide cardstock, I've added a full size panel of Tea Boutique DSP with a circle cut out of it using the Layering Circles Dies. From another piece of Tea Boutique DSP I've cut a teacup with the Teacup Dies and added baker's twine and a bow then attached the cup in place with Stampin' Dimensionals. 

The greeting from Sit Stay Relax is stamped in Orchid Oasis onto Basic White cardstock and fussy cut then also attached with Stampin' Dimensionals. To finish a few of the (retired) Metallic Pearls.


Nothing like a nice cup of tea!

We hope you get to join us with the challenge this week. Make your card and post it to our Facebook page using the link over on the right before next Sunday evening.

Next up we're off to visit Monique:

Sunday, 3 July 2022

#CTC376 CASE Mini Catalogue

CASE the new July-December Mini Catalogue:


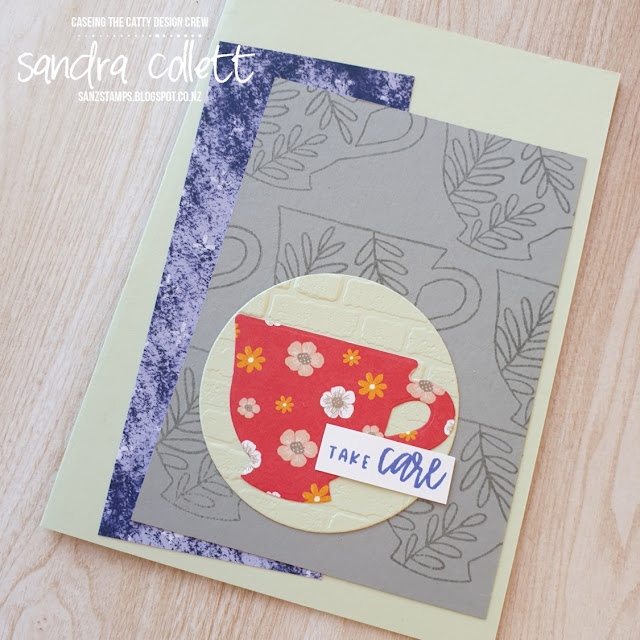
I've turned to Page 54 and used the layout with the apple card on the right:


Onto a base of Soft Sea Foam I've added a strip of Tea Boutique DSP at an angle. Next I've used a Teacup stamp from Cup of Tea together with Smokey Slate ink and cardstock to stamp the image all over for the background. In hindsight the original looks like it may have been stamped off, but I didn't mind the heavier images. 

I embossed a scrap of Soft Sea Foam cardstock with the Brick & Mortar 3D embossing folder and diecut a circle from it using a Layering Circles die which I glued onto the stamped background. The teacup was diecut with the Teacup Dies from another sheet of Tea Boutique DSP and added to the embossed circle. The greeting from Cup of Tea was masked off and stamped with Orchid Oasis ink onto a strip of Basic White cardstock and popped into place.


A relatively easy layout to replicate but quite different from the original.


Just because you don't have product from the new catalogue on hand, doesn't mean you can't join us in CASEing the Catty Sunday challenge this week. Make your card and post it to our Facebook page using the link over on the right before next Sunday evening.

Next on the hop we have our friend Rebecca and her pretty pastel card:

Sunday, 31 October 2021

#CTC342 CASE Favourite Mini Catalogue Project


CASE our 
Favourite July - December Mini Catalogue Project

The bottom card on Page 56 attracted me


Onto a base of Mossy Meadow, I've added a distressed piece of Hand-Penned DSP. Seems I accidentally rotated my piece but it still works - thankfully it didn't have script on it like the CASE card. 

I've stamped the poppies image from Pleasant Poppies in Early Espresson ink onto Basic White and diecut using a Layering Circles die. I've coloured the image with Daffodil Delight, Mango Melody and Pumpkin Pie Stampin' Blends and attached that to the DSP.

I've used Mossy Meadow ink with Many Messages in the area I wanted to diecut using the Messages die. I've added a Baker's Twine bow behind the greeting and popped it on the card using Stampin' Dimensionals.


This is a super simple to create and easy to change out the theme or reason to send.


We look forward to seeing what you create. Just pop your picture on our Facebook page using the link over on the right.

Next up we have our lovely friend Julia and I'm excited to see more of her exciting projectthis week

Sunday, 3 October 2021

CTC338 - CASE Sketch on Pg 34 of Mini


This sketch on Page 34 of the August - December Mini Catalogue:


In a simple format:
I've used a base of Thick Basic White cut lengthwise and folded in half for my base. 

Next I've worked out my top layer also in Basic White. I've diecut a panel of little flowers using the Hydrangea Dies. I've heat embossed a hydrangea flower from Hydrangea Haven and a greeting from Peaceful Moments with gold embossing powder onto Basic White cardstock. The flower was diecut with the Hydrangea Dies and the greeting was trimmed to be a strip to fit. 

My mat is Evening Evergreen and I've snuck a diecut from the Layering Circles to mat my feature diecut onto. I've cut Gold strips from the Gold & Rose Metallic Specialty Paper to add accent from my perception of the CASE card.


I've added a few of the diecut tiny white flowers and popped a Gold Metallic Pearl in the centre. I've added a piece of Baker's Twine tied in a bow around the centre of the card, focusing the bow to the front. Happily sending this off to my Aunty and Uncle to celebrate their 50th Wedding Anniversary. 

Can't wait to see your take of the sketch. Pop your photo up on our Facebook page using the link over on the right.

Next on the hop we have Monique!


Sunday, 13 June 2021

#CTC322 CASE the Birthday Section


CASE the Birthday Section - pages 60-67 of the Annual Catalogue:


I chose the image on the top left of Page 67:


I don't have the Picture This Dies which would make this a bit easier, but I was quite happy to make my layout using the Layering Circles Dies. I've used a base of Bermuda Bay and cut the top mat from the same colour then cut the circles out. 

I've paired the layout up with the cute critters from Snail Mail Designer Series Paper. Lots of fussy cutting and no stamping. I liked the effect where the original card had some of the image on the bottom layer and the rest on the top layer. You may not be able to see it clearly in this photo but I'll pop a couple of angled shots in to try and capture the perspective. 

I've used a bottom mat of Pool Party and to get my placement I traced the circles in pencil. Onto the base, added the elements then adhered the bottom mat to the base card and popped the top mat onto Stampin' Dimensionals and into place. As per the CASE card I've added a Baker's Twine bow and some bling - using the retired Flowers for Every Season Gems.

Sad to see the Snail Mail suite will soon retire.


A little bit of fun for a dreary winter's day.


We look forward to seeing you create a challenge card and posting it to our Facebook page using the link over on the right before next Sunday evening.

Next up check out Michelle's version of the same CASEd card! Snap Michelle :)

Sunday, 27 September 2020

#CTC287 CASE a Leaf/Tree Project from the Mini Catalogue

Here's a fun challenge! CASE a Leaf/Tree project from the Mini Catalogue - loads of choices and up to you as to what you do - love to see it, join in by next Sunday evening using the link over on the right. 

I didn't realise until now that I've actually used the CASE picture - far right as my choice.

I've been a long time fan of the repeat words in the background so it wasn't a hard technique to go back to. I went with the words from Inspiring Iris and chose Soft Sea Foam for my cardstock and Just Jade for the ink. I've used my Stamparatus to help me keep things relatively the same as the initial card but because my words had two lines of text they look quite different. 

Don't have the hoops yet? Neither do I (although I love what I'm seeing with the people who have used them). I went with Silver Foil Sheets and Layering Circles to cut a frame which I've popped on top of Misty Moonlight ribbon. My top layer is Magenta Madness diecut with one of the Ornate Borders dies and trimmed to fit.


Thanks for stopping by. Next up please visit out lovely Western Australia friend, Siobhan:


Saturday, 26 September 2020

Social Stamping - Baby


Back for the Social Stamping monthly blog hop with Kelly Kent and friends and our theme this month is 'Baby'! I can't wait to see everyone's take on this theme, but I've gone with a traditional just for baby card. If you've just visited Denise, I want to thank her for lovely intro, so nice to know I've met her in person and appreciate the kind words x

I've diecut the words Welcome and Baby; and a tiny heart using the Well Written dies from Pool Party cardstock. I've used the Layering Circles to cut a circle of So Saffron cardstock for my balloon. 

The little animals from Special Someone have been stamped onto Whisper White cardstock using Smokey Slate for the outline and So Saffron for the body colour. I've made a mask from scrap paper and popped it over the raccoon before stamping the squirrel. Prior to adhering the balloon, I used Smokey Slate to stamp the string the raccoon is holding. I've also sponged around the edge of the balloon with Smokey Slate to give it a little depth with a little heavier colour on the left. After adhering the words I've added a bit of highlight to the right of the balloon using the Chalk Pen.

My top layer has been added to a mat of Pool Party and adhered to a thick Whisper White card base. The little heart is a gift from the little squirrel.


Thanks again to Kelly for hosting us and thank you for stopping by. Please carry on over to see what the lovely Sheila has created for us this month:


If you get lost along the way, click here to take you to the main page and a full list of participants.

Sunday, 5 July 2020

#CTC275 CASEing the Sketch on Page 130


The Crew are CASEing the card on the right on page 130:


Here's the sketch to help you play along:


My go to thick Whisper White card base has a mat of Just Jade embossed with the Bricks & Mortar 3D Embossing folder. I've diecut with the Stitched Rectangles a piece of Flowers for All Seasons DSP which gave me a mat and a frame. After adhering the mat in place (realise it could have been a bit further up, but it's ok for a change), I've turned the frame around and popped some Foam Adhesive Strips on the back to give some dimension and it made the stripes just a little different. 

I've used the Layering Circles Dies to cut a piece of Forever Gold Laser Cut Specialty Paper and a piece of Whisper White the same size, then adhered the gold to the white with a bit of multipurpose adhesive. I've popped this onto Stampin' Dimensionals avoiding the edge of the frame so it was the same height. 

I've diecut a bird in Cinnamon Cider from the Birds & More dies, adding a scrap of Basic Black cardstock behind the bird to define the markings the die makes and glued it in place. The greeting is from a set in the Beginner Brochure called Four Season Floral. I've used Just Jade ink on Whisper White cardstock and cut it down so it didn't cover up the gold foil. 


To finish I've added a (retired) Baker's Twine bow and some of the little Flowers for Every Season Gems.


We'd love to see your version of the sketch. You have until next Sunday evening to make a card and add the picture to our Facebook page using the link over to the right.

Next up we have the lovely Judy May: