Showing posts with label Wink of Stella. Show all posts

Saturday, 29 May 2021

Social Stamping - Subtles


So exciting to be able to join Kelly Kent and friends for the monthly Social Stamping Blog Hop! This month our theme is "Subtles" which is one of the Stampin' Up! Colour families.

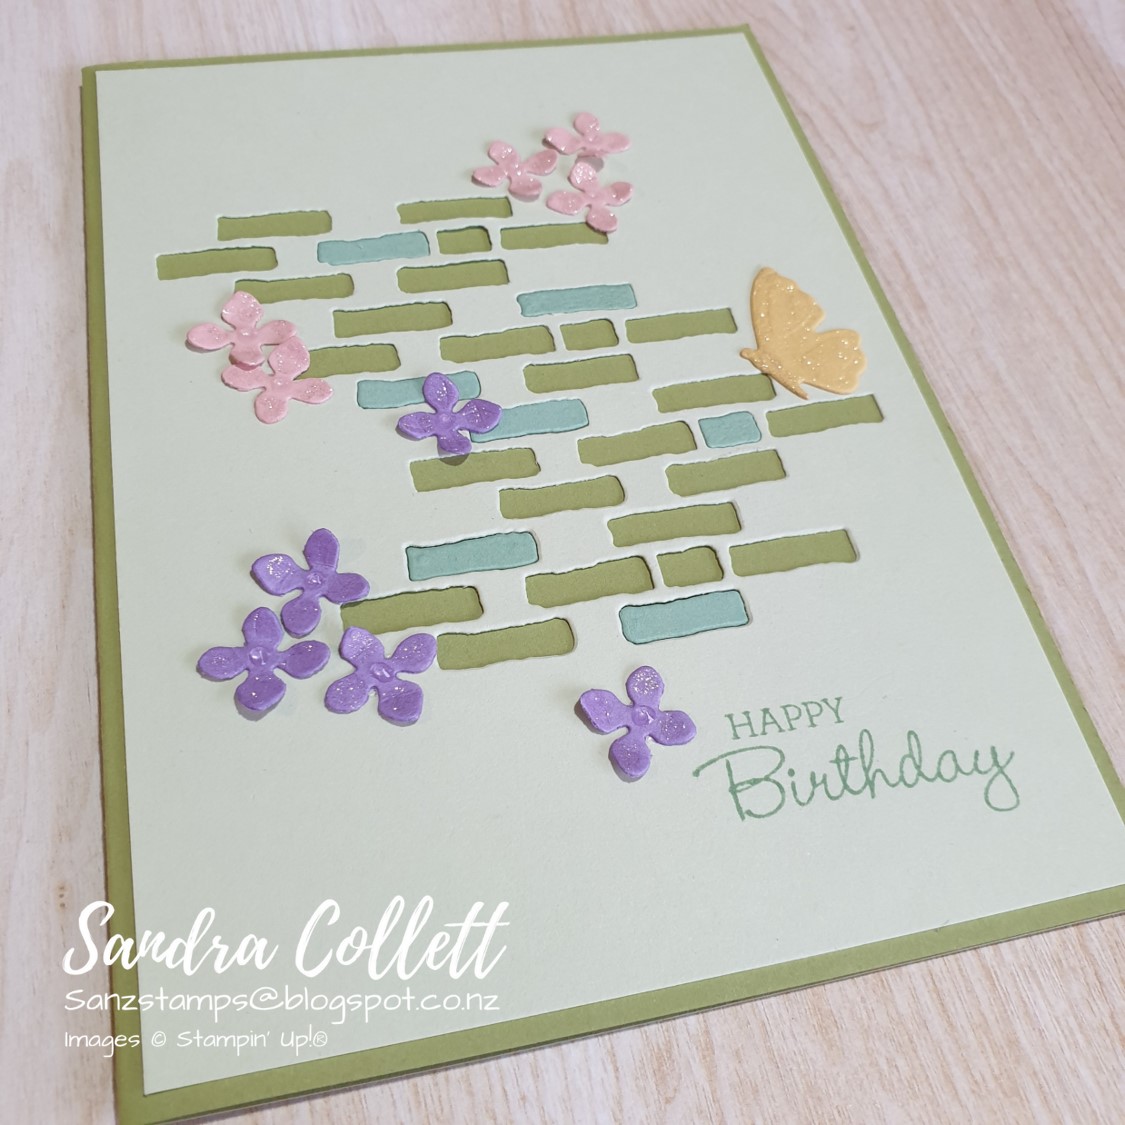
I used the brick die from Brilliant Wings Dies and cut it four times from a sheet of Soft Sea Foam for my top layer which I've added to a base of Pear Pizzazz. Then I've cut another piece of Mint Macaron and added some of the bricks randomly to give more interest. The greeting is from Pansy Patch and stamped in Mint Macaron ink. I've added a So Saffron diecut butterfly from Meadow Dies and hydrangea petals cut from Hydrangea Dies in Blushing Bride and Highland Heather. 


The hydrangea flowers have had some Fine Tip Glue added to the centre and the flowers and butterfly were smothered in Wink of Stella.


I've even managed to find time for some inside love!


This time I've used the blending brush and sponged with the negative the bricks were cut from, then stamped another greeting from Pansy Patch in Mint Macaron with the same flowers and butterfly as the front again covered with Wink of Stella.


It's a wintery day here in NZ, and we're expecting a whole lot of rain in the next day or so - I hope wherever you are that you are keeping warm and dry!

You're now headed back to the start of the hop with our lovely host Kelly, which is where you will also find a list of all the participants this month:

Sunday, 16 August 2020

#CTC281 CASE from Annual Catalogue Punch Bundle Section

 
CASEing the Punch Bundle Section, pages 168-169:

This picture also happens to use the card I've CASEd - the top picture, which is the third card down on page 168.

I don't own the Field of Flowers punch but the card reminded me instantly of the Painted Poppies I'd used recently so I reached for that set to begin. I stamped the poppies onto Whisper White with Old Olive Ink. To resemble California wild poppies I've coloured with Dark Mango Melody and Dark Pumpkin Pie Stampin' Blends. 

The greeting from Special Someone is heat embossed with White Embossing powder onto Pumpkin Pie cardstock. I've trimmed it to 1/2" thick and instead of a banner, I've used the Lovely Labels Pick a Punch to give some interest to one side of the greeting. I've adhered this panel onto a diecut of Ornate Layers dies using Old Olive cardstock. I've trimmed it straight as per the CASEd card and popped it all on Stampin' Dimensionals. 

Next I've stamped the butterflies from Special Someone in Old Olive - the CASE used four flying critters, but I had to add an extra. To finish it all off, I've used Wink of Stella on both the butterflies and the flowers.

I've even managed to give a bit of inside love to this card using another image from Painted Poppies and the same Blends as above along with Old Olive and again finished with Wink of Stella:

This may give a better idea of the Wink of Stella effect:

If you like these colours, you may be interested in the Box of Sunshine Paper Pumpkin kit which is available from your demonstrator now. Check out this blog post for some different ideas using the supplies. 

Next up we have our lovely Rebecca:

We hope to see you play along with the challenge this week. You have until next Sunday evening and you can post your picture to our Facebook page using the link over on the right.

Sunday, 24 June 2018

#CTC184 - Delightfully Detailed


This week sees us CASEing a project from pages 38-51.


I've used the image in the top right of the photo on the left hand side of page 48:


Again I've CASEd the layout. Aren't those little critters cute? Unfortunately they don't relate to anything in our country, so in the meantime I'll admire what everyone else creates with them. 

I've gone back to my cute Granny image from You've Got Style in place of the critter. She's been coloured with Stampin' Blends and fussy cut. I've switched the DSP and embossed pieces around, to make the most of the beautiful Petal Promenade DSP. The card base is Mossy Meadow and the embossed section is Blushing Bride using the Basket Weave TIEF. The two largest Stitched Shapes circles were used to cut the frame in Calypso Coral. I've added a piece of retired Lemon Lime Twist mini striped ribbon and the greeting is from Painted Glass inked in Mossy Meadow.


The lady looks like she is off to celebrate at a garden party - least she'll be warm! What's a party without a little bling, not sure if you can see it, but I've broken out the Wink of Stella for the drink and jewellery:


Don't forget to play along, using the link over on the right sidebar. Let's now visit the lovely Rebecca and find out what she's created for us this week:

Wednesday, 14 June 2017

Baby Themed International Blog Highlight


Doesn't seem a month since I last got to play along with the other blog highlight entrants where the top ten voted get invited onto a blog hop.  The theme is "Baby' and I've tried to keep it simple, but steer slightly away from the normal pastel colours associated.  All things being equal, I created a Tempting Turquoise for the boys, and Melon Mambo for the girls.


This cute little image is one stamp from Moon Baby. I've chosen to water-colour in the same shades as the mats and add a little Daffodil Delight to the stars, another stamp from the same set (I used the trio stamp although there is also a single star). The little lamb has a Wink of Stella tummy and the background stars have all been Wink'ed too...see further below for a close up. Both mats have been elevated with Stampin' Dimensionals with a little silver metallic thread behind the top mat.  If you like what you see - I'm #31


Close up to show the sparkle:


Wednesday, 31 May 2017

Kelly's Stamping Friends - Blog Hop


I am delighted to be part of this blog hop created by the lovely Kelly Kent to celebrate her 5 years of being with Stampin' Up!. I first met Kelly when we shared a Demonstrator Booth at the Stampin' Up Convention, Gold Coast 2015 and she has been inspiring me ever since. It seemed appropriate that she offered up the theme of 'Happy' - firstly because that's just what Kelly always appears to be; and secondly, because of the excitement building with the new catalogue kicking off tomorrow!.

I've combined a few things that make me happy; Colour, Butterflies and Nature.  The Butterfly Basics set called out to fill the brief. 


I used the background stamp and Sweet Sugarplum on the Fluttering TIEF to create the background.  I then used the small butterfly and Daffodil Delight to pop some colour onto the bigger embossed areas. Next I tore down an edge of vellum and randomly stamped the fern and leaf images over it in Garden Green before adhering to the embossed Whisper White. Twine was wound round and finished with a double twine bow, matted with Daffodil Delight and mounted onto a Basic Black base. I stamped three flower images onto Whisper White and coloured with markers and an aqua brush - then lots of fussy cutting. I kept with the gardening rule of odd numbers for the flowers, and popped dimensionals under each before attaching to the vellum.  


The greeting was stamped in Basic Black then again with Daffodil Delight, slightly offset. It was then cut with the Stitched Shapes circle, and mounted onto a Sweet Sugarplum Layering Circle. Butterfly of Daffodil Delight layered with a strip of Sweet Sugarplum ruched ribbon, Linen thread, a smaller Garden Green butterfly and a vellum butterfly stamped with Daffodil Delight. To hold them together I did some hand stitching with linen thread. Wink of Stella provides the sparkle and Daffodil Delight enamel heart the finishing touch. .

Of course, I needed balance on the inside, so replicated the mat, then stamped and coloured the flower image. Being a finished size of 6" square, I have also created an envelope from a retired DSP, with the same stamped and coloured image. This card is going to another lovely lady - my amazing mother, who will soon mark the 2nd anniversary of Dad's passing - love you Mum xx


Thanks for stopping by, now hop over and check out what Cheryl O'Bree has come up with

Wednesday, 15 February 2017

Get Well Soon - International Blog Highlight


I am signed up to Kylie Bertucci's International Blog Highlight, where our projects get voted on, and the top ten get to be part of a blog hop. As you will see - the topic is "Get Well Soon" which I did struggle with for a while.  If you like what you see below, please vote for me "Sandra Collett".

The direction I started off on will perhaps become a project for another time, but has been used as the prop for my photo. The new Mini Egg Carton was spritzed with Rich Razzleberry reinker and water - #suchfun!.

I knew I wanted something bright and cherry as when you're a little under the weather you need something to lift your spirits. This project evolved in different directions as I went, but that's the great thing about crafting - doesn't always have to be fully planned when you begin.

I started with some vellum cardstock and heat embossed the words "Get Well" using the Layered Letters Alphabet and white embossing powder (which looks more like cream in the photo).  It didn't have the dimension I wanted so I reached for the Hexagons Dynamic TIEF (I think know this will get a lot of use from me) and embossed the vellum.  I couldn't decide what I wanted behind it after trying both plain cardstock and dsp. I ended up using the Rich Razzleberry ink pad and swiping colour across the back of the vellum.  While the ink was drying I cut mats from Rich Razzleberry and Whisper White cardstock.  Out of the top mat I cut a window and adhered this over my trimmed vellum. I reached for an old favourite - Petite Petals and created a bunch of flowers with the matching punch. I used the Bold Butterfly framelits and cut 3 butterflies which were stacked and slightly offset as I went - Whisper White, Rich Razzleberry and Vellum - of course  with a couple of rhinestones. The white layer had dimensionals added under it, although you can't tell from this angle.


On the inside I stamped "Soon" from the same alphabet set in Rich Razzleberry, along with some flowers in a couple of corners.  The butterfly was die cut from the scrap of hexagon embossed vellum - like the soft yet random effect.


The detailed photo shows how prior to adding the flowers I went around the embossed letters with a Rich Razzleberry marker (pen end). To complete the card Wink of Stella was used over the butterfly, letters and centre of the flowers. Thanks Kylie for inspiring me to find Mo and Jo!!


Monday, 14 November 2016

Swan Lake Sneak Peek

Yesterday I decided it was time I used the stamp set I won at Prize Patrol at #onstagelive as then you'd get a sneak peek of an item in the new occasions catalogue, and it would satisfy the colour challenge #gdp061 posted on the Global Design Project which used Sweet Sugarplum, Emerald Envy and Basic Black.

Then I looked out my window and was guilted into garden time. As always, by the time I get back to my project, the motivation has waned a little and the muscles ached a little more that anticipated!  Roll forward a few hours to a rude awakening with another massive earthquake and sleep was a distant memory. Once daylight arrived and all messages had been responded to the urge to go outside again departed and I knew it was time for some stamp therapy. My thoughts go out to those who have been affected by the lives lost earlier today.  Aftershocks are continuous, and we had a 6.4 while I typed this.

Possibly not a set I would have thought of getting initially, it is good to be challenged to make something out of your comfort zone.  This is a very clean and simple kind of card but the touch of colour is all it needed.  The swan is a stamp on its own, but I masked the cygnets so it fit nicely behind.  I couldn't decide which background colour I liked, so did one of each. Colouring was done with my aqua painter, and you won't see it in the photo but there is a flick of Wink of Stella here and there.


Hard to see that they are on black base cards, so here is a close of each:


Wednesday, 9 November 2016

Onstage Live - Brisbane 2016

How lucky was I to be able to attend Onstage Live in Brisbane last week?  Sharing a room with some amazing demonstrators from Melbourne and Sunshine Coast, provided a lot of laughs. As on previous trips, I came home inspired and motivated by the talent shared within the Stampin' Up community.  We saw several onstage demonstrations and received oodles of ideas. If you've been feeling at a loss and need some sort of outlet, contact me, you might be surprised at the extra benefits being a Demonstrator provides. For instance Therapy with Friends - what more could you want?!! #onstage2016

Today, I wish to share some of my treasures with you.  These are the pillow gifts I was lucky enough to receive from my roomies


And here they are: Julia, Nicole, myself, Fi and Janine


Friday night was a team get together for a meal and a swap.  The size of the swap was 3"x4" and this was my effort (Using Botanical Builder framelits; Petal Burst TIEF, Labels & Tags Framelits, Fancy Frost Sequins, Wink of Stella and the colours were Tip Top Taupe, Bermuda Bay and Whisper White)
:

With nearly 30 people swapping, check out the great ideas I got to come home with:


Another benefit of attending is we get to play with new product along with receiving our copy of the new Occasions catalogue and Sale-a-Bration brochure.  These are the make and takes we did. 
 

Thanks to everyone who made the trip so memorable.


And leaving Brisbane airport - it's beginning to feel a lot like Christmas!


Thursday, 11 August 2016

Thoughtful Branches and Watercolour

As you may have noticed, I am making the most of the short time I can share this bundle (Thoughtful Branches) with you but hoping like crazy it will make a comeback in a future catalogue!  I know I've tried to encourage you before to play with your toys and keep trying until you master a technique, but when I try to do the same, I struggle with not using it. I had some non-SU watercolour paper (not a great quality by any means) and thought I could sacrifice that rather than my 'good' stuff. But I liked the look and these are the results.

The first card I wish to show you was an idea shared by Sara Douglass, Stampin' Up! CEO. The background is masked off at the edge, and then washed with 3 different colours and left to dry. I then veered off from using the leaves she had and added the tree you can see here. I unravelled the thick Cucumber Crush baker's twine and added it to the card, tying it with a single strand. The greeting is from Confetti Celebration.  I used my Wink of Stella brush and picked up Daffodil Delight to colour in the words, Then I wanted more bling so I added a few sequins and Wink of Stella to the leaves - see close up.  And it made it to the mailbox yesterday.


For the next card, it was the same watercolour paper, and this time I just lay a stamp pad on it (Tangelo Twist), the ink was very intense and I initially thought that was going to be a big fail.  However I spritzed it with water and left it to dry.  It was fun watching the colour come apart and spread.  I spritzed again and was happy with the how it toned down yet still enough variety to provide interest.  I cut it out with the Beautiful Branches die and was pleased with the result. I cut a stalk out of the same paper and used the Cucumber Crush ink pad then spritzed as before. Once I had my flower sorted, I knew I wanted to pop it into a vase - so out with the Jar of Love and my new copper embossing powder.  I love how the copper melted so smoothly on the vellum I used for the jar.  I used a marker to colour the back of the vellum for my water.  The head of the flower had dimensions in the centre of it and then I used multipurpose adhesive around the edge - gives a more real look to the hydrangea idea. I picked a Touches of Texture image and embossed that twice at the bottom of the Very Vanilla card and ran the top through the Petal Burst TIEF.  I added a copper embossed banner and a greeting which I brought the Cucumber Crush back into.  I also added some copper metallic thread - see the close up.  A lengthy post but lots of detail to try and explain.