Showing posts with label Many Layered Blossoms dies. Show all posts

Sunday, 3 April 2022

#CTC363 CASE Favourite Retiring Bundle


CASE your Favourite Retiring Bundle


Always a sad time of the year seeing what won't appear in the next catalogue but mixed with a touch of happy at the lovely new products you'll see in a month.

I've CASEd the Many Layered Blossoms bundle card on Page 158:


This challenge coincided with the need for a Sympathy Card. I started with a base card of Thick Basic White and changed the stencilled background to an embossed layer of Basic White using the Bark 3D Embossing Folder.

The flower layer was made using Highland Heather from the thicker Many Layered Blossoms dies. The top layer was Basic White with Adhesive sheet adhered to the back of it, makes it much easier to match up and attach the two sections together. I then lay all this onto a piece of Hand-Penned DSP and fussy cut so that it filled in as the background without any extra showing. 

The greeting from Blossoms in Bloom was stamped in Highland Heather onto a diecut from my spares box and I tucked one end in behind a flower.


The Highland Heather centres of each flower have been touched up using Wink of Stella. 


I think I'll have to hang onto this set for just a bit longer. 

What is your favourite retiring bundle? Maybe you'll join us with the challenge this week. Make a card using it or CASEing it before next Sunday evening and add it to our Facebook page.

Next up we have our friend Julia and some more of her fabulous scrapbooking:

Sunday, 6 September 2020

#CTC284 CASE from Annual Catalogue Die Bundle Section


CASE from the Die Bundle Section of the Annual Catalogue - pages 173-179


The card on the bottom on the picture was my inspiration using the Blossoms in Bloom bundle! 
I thought the colours looked amazing together and just changed them around a little bit.

I was also recently inspired by a fellow Demonstrator, Tracy Held from Australia, who showed us her version of the split card technique - I'd seen it before but never given it a go. Tracy made me feel a little more confident and so I wish to give her some credit as I just went from her video and didn't look up anyone else. Thanks Tracy!

I've started by applying adhesive sheet to the back of a piece of Whisper White cardstock and diecut with the Many Layered Blossoms top layer die and my Stampin' Cut & Emboss - seriously still impressed that one pass cuts all the fiddly bits out! Next I stamped the Blossoms in Bloom large flower in Basic Gray ink onto Smokey Slate cardstock. The cardstock is twice the size of my normal top layer at this stage. I've removed the adhesive cover from the diecut and placed it over the stamped image. I've then used my guillotine to chop the cardstock in half - making two card fronts from one image!  

I chose to rotate one of them so that my cards both placed the image on the left. I've used So Saffron cardstock to cut some of the smaller flowers with the Many Layered Blossoms die bottom layer, and then Blackberry Bliss for the matching shape in the top layer. I've attached the flowers to the card top using a glue dot. 

I've used Versamark then Blackberry Bliss ink and covered with Clear Embossing powder before heat setting  the greetings from Blossoms in Bloom. They were punched out using the Lovely Labels Pick a Punch according to their height and added to the card using Stampin' Dimensionals. Each has a mat of Blackberry Bliss and a base of Thick Whisper White cardstock.


The crew would love to see you play along. Once you've joined the Facebook Challenge page - CASE a card, take a photo and post it using the link over on the right. Next up we have our lovely leader, Rebecca


Tuesday, 11 August 2020

Box of Sunshine Alternative Ideas

WOW - Stampin' Up! have knocked it out of the park with this gorgeous all inclusive Box of Sunshine! It has everything; card bases, stamps, black ink spot, diecut elements, stickers, adhesive sequins, glue dots, dimensionals and the most stunning gold foil envelopes (the only thing you need is a block for the photopolymer stamps)The intention is that you use the kit you have purchased and then repurpose the box to gift to someone and maybe it will continue on for a while. 

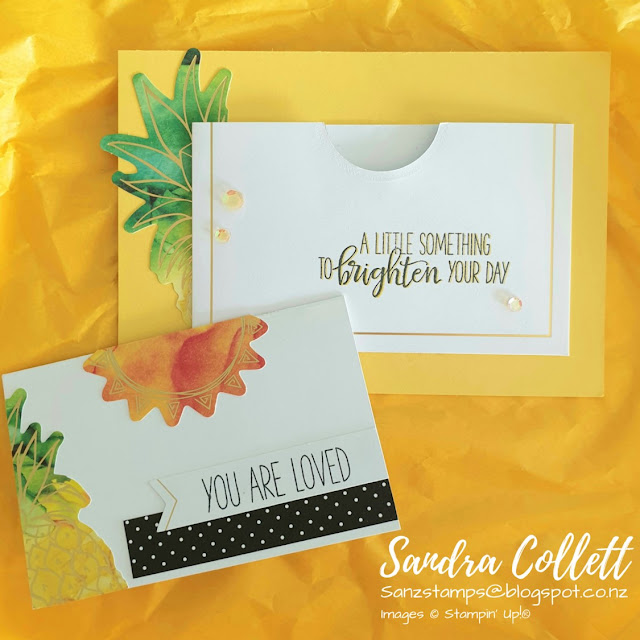
I'm not here to show you the cards in the kit, I've got some unique alternatives using some extra cardstock and tools you may have. Here is the box redecorated with the address stickers provided:

The fine lines you can see around the elements is gold foil. Lemons and pineapple feature along with the sun and leaves. 

I might regift this box with something like this.

Chocolate, tea bags, tissues and a handmade project can be wrapped inside the tissue included in your box.

I used Daffodil Delight for my project, with Shaded Spruce embossed with Pinewood Planks and a few of the diecut elements.  On the inside - Lemsip!

Next I've made some cards. Using the Flowers for Every Seasons Memories & More Cards & Envelopes. I've cut one of the foil envelopes and trimmed the dotted sticker to the same height. I've cut a strip of Shaded Spruce cardstock to become my stem and adhered the sunflower at one end and leaves at the other, popping it all on with dimensionals. The greeting is Lovely You punched with the Lovely Labels Pick a Punch.

Inside a cheery envelope:

I've used a Basic Black card base and diecut the back layer out of a card from the kit with Many Layered Blossoms dies. I've adhered Adhesive Sheet to the back of Whisper White and cut the top layer then stuck the two layers together. I've popped mini dimensionals on the back to place it on the card. 

Inside the tiny flowers from the same die set:

With one of the other swirly patterned cards, I've managed to diecut five poppies and stamens using the Poppy Moments dies along with leaves from Granny Apple Green, Shaded Spruce and Basic Black.The black and white dotted background and frame are self adhesive.

A little more inside love using Painted Poppies and the adhesive elements:

The fifth poppy became a gift tag (or bookmark) using part of a gold and white striped card:

A pocket card from a quarter sheet of Daffodil Delight cardstock and the other half of the envelope above. Greeting is stamped in Basic Black and then again in Mango Melody a smidge over. I've chopped a piece out of the pineapple as it wasn't going to be seen and stuck the rest of it and the envelope to the card. I've used the white half of the piece I diecut the poppies from and folded it to create the card for the pocket. 

Card decorated with elements from the kit, utilising the piece of pineapple from the base and finished with the adhesive sequins.

Seriously, I still have loads of elements left to create with, but I hope these ideas inspire you to try something else with your kit and spread some sunshine. 

How about some fussy cutting after the elements have been removed and adhering the pieces to cardstock. Leave them as is or for some texture try embossing with Old World Paper 3D Embossing Folder. This is a fun card to pop into a care package I'll send to my daughter closer to exam time. The gold frame is from the adhesive sheet for decorating the box:


Hopefully it will make her:


Thanks for stopping by 😊

Sunday, 7 June 2020

#CTC271 CASE the New Catalogue


We are CASEing the inside of the new catalogue this week, as we couldn't share images of the inside last week, so this is Week 2 of CTC271.


I've chosen the card on the bottom right of page 44:


I've diecut a heap of Stitched Nested Labels shapes from Seaside Spray cardstock as well as one in Whisper White, and made a template to hold each blank in the Stamparatus. Next, again using the Stamparatus, I lined up the greeting from Butterfly Wishes and using Granny Apple Green stamped each of the blanks - much easier than lining up the greeting each time.

I've adhered them randomly to a full card size piece of Seaside Spray cardstock and stuck that to a thick Whisper White base.

I've diecut the top layer of the flower from Many Layered Blossoms dies in Highland Heather, and the second layer from Purple Posy, along with the leaves in Granny Apple Green. A bit of fussy cutting to narrow down to the shapes I wanted, and I glued them together with Tombow. I added a background of Bumblebee In Colour 6" x 6" DSP. Next I diecut a Whisper White circle using Layering Circles and embossed it with the Subtle 3D embossing folder then glued it onto a scallop circle of Granny Apple Green adding the floral arrangement on top.

A piece of Petal Pink Organdy Striped ribbon is tucked under the scallop and the White shape has been popped up with Stampin' Dimensionals.


We hope you're able to join us this week. Use the link over on the right and post your card to our Facebook page before next Sunday evening.

Next up is our lovely Julia and she has a stunning array of cards to show us: