Showing posts with label Pattern Party DSP. Show all posts

Sunday, 20 March 2022

#CTC361 CASE an Animal Card

CASE an Animal Card from either catalogue:

I have used the card at the top right of Page 44:


For a while I've been wanting to have a play with the Mischievous Mice Hostess set from the January-June mini catalogue. Not a big fan of the real thing especially when they get in my pantry, but these wee guys are pretty harmless.

I've started by stamping the mice in Soft Suede onto a panel of Basic White cardstock and colouring them with my blends. As per the CASE picture part of the subject was stamped off the edge, that's why I didn't mind the whole balloon didn't fit in the picture. 

The hello stamp from Blossoms in Bloom was repeat stamped by using the Stamparatus in Soft Suede, Bumblebee and Calypso Coral. The base card is Soft Suede and I've added 1/2" strips of Pattern Party DSP, the original used three different papers but I've stuck with two and alternated them. I've added the coloured panel to finish giving it just a nudge to tip it so it didn't seem too formal.


Unlike me but I've also added a bit of interest on the inside as well:


This card is heading off to the Gold Coast for a wee poppet with a brain tumour. Hope it brightens her day.

Is there an animal card in either of the catalogues that caught your eye? We would love to see you CASE it and add a photo to our Facebook page before next Sunday evening. Use the link over on the right if you like.

Next up we have our friend Rebecca:

Sunday, 14 November 2021

#CTC344 CASE an Embossing Project


CASE an Embossing Project - you choose, heat embossed, dry embossed....


I've turned to Page 54 of the July-December Mini Catalogue and the card on the bottom right:


I've started with a piece of Basic White cardstock which I white heat embossed twice with the image from Quiet Meadow. I've then used the resist ink technique with Pool Party ink and a blending brush. Next I've dry embossed this with the Timeworn Type 3D Embossing folder. 

I've added a couple of strips of Pattern Party DSP. Onto this a diecut from Meadow Dies of foliage in Mango Melody was added, as it toned with my choice of DSP and added colour without the fussiness of the original card. My greeting is stamped in Basic Gray ink from Turtle Friends onto a strip of Basic White and adhered in place. 

The whole layer was added to a base of Basic Gray cardstock and finished with a few Metallic Pearls.


My embossing doesn't stand out as much as the original but it works for what I was after. Not sure if that was my colour sponging choice or the image I used was a little finer than the one they used to emboss.


We hope to see you play along CASEing an Embossing project this week. Just post your project to our Facebook page using the link over on the right. You have to join the page first and answer a couple of simple questions.

I can't wait to see what Rachel has to share with us this week:

Sunday, 12 September 2021

Triple Easel Panel for an 18th Birthday

Happy Birthday Grace!!

18th birthdays call for a bit more effort in a birthday card. I was looking for something different and turned to Splitcoast Stampers for some inspiration. The first thing to catch my eye was a project from Mary Deatherage using the Penguin Playmates DSP which you can only get for a few more weeks as a Sale-a-bration freebie.

I must admit, I only looked briefly at the card, and went with my instincts from there, but you can click on her name above to be directed to her instructions.. I didn't use the measurements as often they are using Letter size cardstock rather than A4. Because of the three panels I decided to use the width of the cardstock and cut it at 6" long because that was easy to divide into thirds.

The base card is Pool Party. The Pattern Party DSP was cut to 1 3/4" x 3 7/8" then diagonally and adhered to the panels. Poppy Parade cardstock was used for the numbers (retired Large Numbers dies) and the balloons which were punched with the (retired) Balloon Bouquet punch. The numbers were embossed with the Ornate Floral 3D embossing folder. 

The top penguin and polar bear were fussy cut from the Playful Penguins DSP, with the centre penguin being punched with the Penguin Builder punch from the same DSP. The balloons have had a bit of highlighting added with the Stampin' Chalk Marker.

All the pieces were added to the lower half of the panels ensuring no stray adhesive. 

The little parcels were stamped from Penguin Place in Flirty Flamingo and Granny Apple Green, fussy cut and popped in place with Stampin' Dimensionals. This is what creates the pieces for the easels to stay in place.


I've added another punched penguin to the inside of the card and a greeting from Handsomely Suited in Flirty Flamingo.


The balloons have some (retired) Silver Metallic Thread tied around the end and the polar beer has had it threaded through the DSP and adhered behind it, with the penguin having the thread attached to the back of it's flipper.

Thanks for stopping by.

Sunday, 5 September 2021

#CTC334 CASE the Gingerbread & Peppermint Suite


CASE the Gingerbread and Peppermint Suite:


I've used the image top left of the photo above.

I chose one of the Black and White sheets of Pattern Party DSP for my background but to bring in a bit more colour, I've used a Flirty Flamingo Stampin' Marker and a ruler, and placed the ruler on each black line and drew a coloured line next to it, horizontally and vertically..


I added the DSP to the Basic White cardbase. Instead of the foil panel in the CASEd card, I've used a piece of Basic White and embossed it with the Painted Texture 3D folder which I mounted crooked on a same size piece of Flirty Flamingo cardstock. I've punched out six Basic White blanks using the Medium Daisy Punch. and set up my Stamparatus with a scrap piece of card having a shape cut out to become my template. I've added each white daisy into the negative space and stamped it with the medium daisy from Daisy Lane in Flirty Flamingo ink. These were adhered in pairs and attached using Stampin' Dimensionals. 

The ribbon is White Crinkle Seam Binding which I've held against the Flirty Flamingo ink pad with a tissue and pulled the ribbon across the ink, then left it to dry. The greeting is from Quiet Meadow in Black Memento ink of Basic White card. I've used the Tasteful Labels dies to cut the shape out and then I've done the same with a scrap of Flirty Flamingo and trimmed around the stitched outer edge to create a frame for the greeting. The ribbon was attached behind the greeting and this was also added to the card with Stampin' Dimensionals.


This is such a versatile layout and would lend itself to many different themes.


What catches your eye in the Gingerbread and Peppermint Suite? We would love to see your CASEd project added to our Facebook page before next Sunday evening using the link over on the right.

Next on the hop we have Rebecca!

Sunday, 22 August 2021

#CTC332 CASE Favourite Annual Catty Suite


CASEing our Favourite Annual Catalogue Suite:

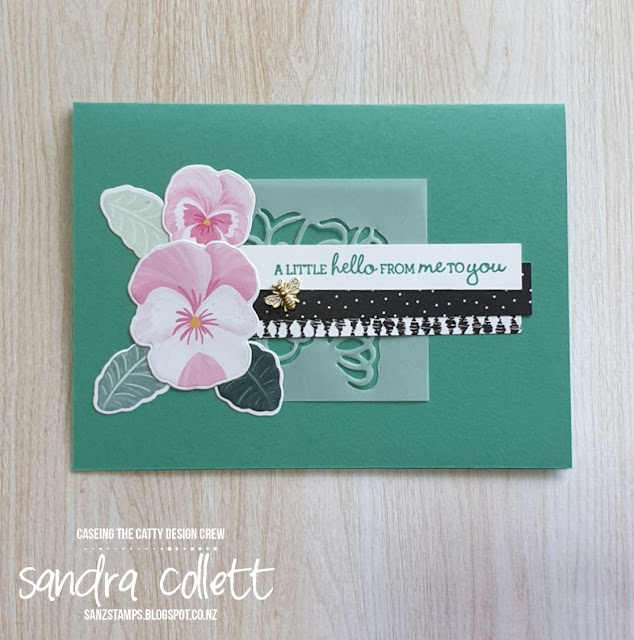
Page 28 and the card on the bottom left was what I chose to use today:

I don't own the vellum doilies featured in the card but compensated by using a rectangle of Vellum cardstock diecut with the cutout shape from the Poppy Moments Dies. 

I've used multipurpose adhesive to attach all the elements to my base card of Just Jade. Onto the vellum shape, I've added strips of DSP from Pattern Party and the greeting from Pansy Patch which was stamped in Just Jade onto Basic White cardstock. I've diecut pansies and leaves from Pansy Petals DSP with the Pansy Dies and finished each card off with a Bumblebee trinket. 

Once I decided on my design, it was just as easy to make two cards. As you can see the purple version in the catalogue, I've used the peach and pink pansies for my cards today.


You may also notice, the vellum has been used both ways after being diecut.

Oddly enough, no favourite today, I like the colours equally.


The winner would have to be that little bee trinket though, super cute!


The crew would love to see you play along. Make your card and post it to our Facebook page using the link over on the right before next Sunday evening.

Next up we're off to visit our friend Rebecca in sunny Queensland:

Sunday, 15 August 2021

#CTC331 CASE Mini Catalogue


Time to CASE the Mini Catalogue:


I've gone with the image on page 30, top middle:


Using the Sweet Stockings DSP, I've diecut three stockings using the Stockings Dies and then Basic White cardstock and the same die set, the little pieces for the toe and heel have been added to each stocking.

With the Timeworn Type 3D Embossing Folder and Basic White, I've embossed the panel I've layered my stockings onto. The Hostess Pattern Party DSP was my go to for the panel behind the main layer and I've also used that to stamp my greeting onto. This was from Penguin Place and using Cherry Cobbler ink, I've stamped and diecut with another of the Stockings Dies. All pieces were added to a Cherry Cobbler cardstock base.

Next on the hop we have our lovely Kathryn:

Sunday, 27 June 2021

#CTC324 CASE a Retiring Mini Project


CASE a Retiring Mini Catalogue Project:


The card in the centre of Page 29 provided my inspiration:

After trimming a piece of Pattern Party Designer Series Paper to fit the front of the card, I've diecut  it using the Beautiful Brushstrokes Dies to create the cutouts. 

Using Petal Pink, Blushing Bride and Flirty Flamingo cardstock I've diecut the layers for the roses. The last two colours have had adhesive sheet attached to the back to make it easy to layer the finished roses. Next Pear Pizzazz and Granny Apple Green provided the colour for the leaves again attaching adhesive sheet to the Pear Pizzazz before cutting. 

The greeting from Brushed Blooms was stamped in Mint Macaron ink onto the diecut shape from Meadow Dies. Everything was built onto a Mint Macaron card base. In lieu of the twine circle, I've chosen a bow using the Blushing Bride Baker's Twine in the Snail Mail Twine Combo pack.

I've finished with some of the Sequins For Everything in Flirty Flamingo.


The DSP used would lend itself well to any of the colours for the background.


Hopefully this will give you a better view of the layers involved:


We'd love to see your CASE of a Retiring Mini Project - please post it to our Facebook page using the link over on the right before next Sunday evening.

Next up we have Rebecca and her cute little roos: