Showing posts with label Timeworn Type 3D. Show all posts

Sunday, 10 July 2022

#CTC377 Sale-a-bration


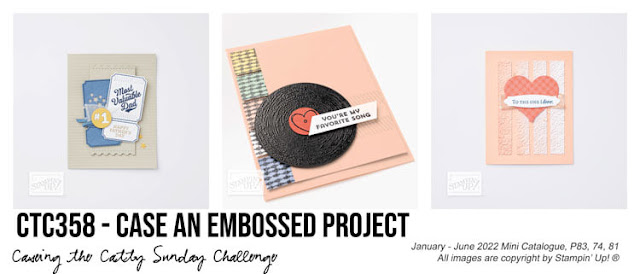
CASEing the July/August Sale-a-bration brochure:

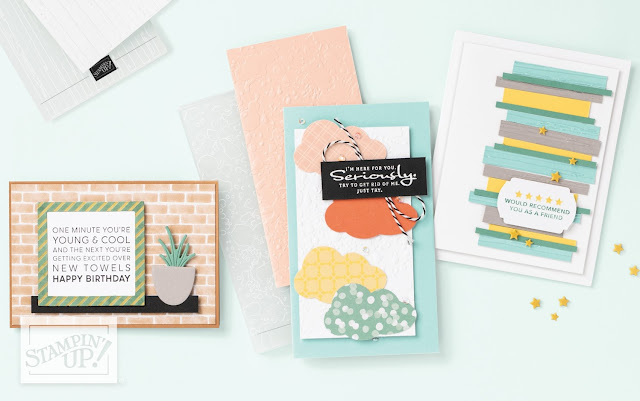
Page 12 and the card on the left:


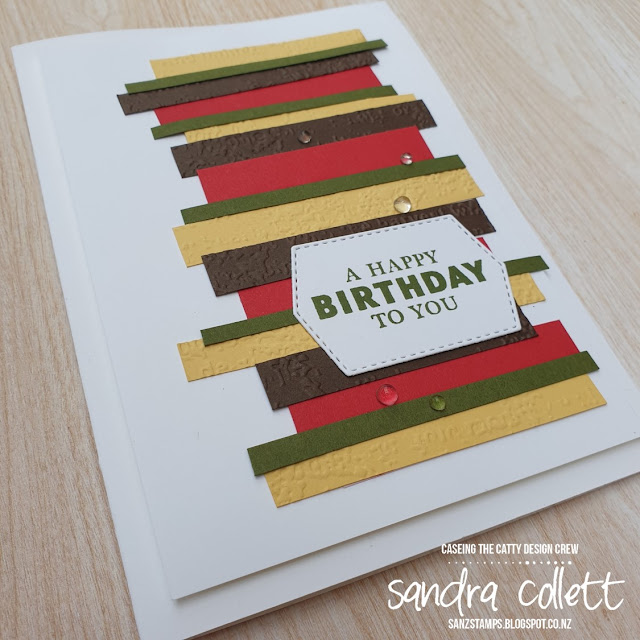
I love being able to utilise scraps to make cards and this certainly happened with this card. I store my scraps in concertina file folders by colour family. Basic Black is stored with my Neutrals still so I grabbed a little piece of that along with the Brights folder.

Using the Spruced Up Outlines Dies, I've cut trees from Daffodil Delight, Granny Apple Green, Melon Mambo and Flirty Flamingo. These were run through the Cut & Emboss machine inside the Painted Texture 3D Embossing folder to add a bit of texture. 

I've embossed a piece of Basic White cardstock with the Timeworn Type 3D Embossing folder and attached it to the base of Night of Navy cardstock. I've switched the orientation to landscape over the portrait case card. I've glued the trees down in much the same colour order as the original. The greeting from Christmas Scottie was inked in Night of Navy ink onto a scrap of Basic White and popped in place. In lieu of a caravan I've punched the Basic Black card with the Scottie Dog Punch and added that to the edge of the greeting.

That little dog is just so darn cute!


Wonder what you might be inspired to CASE from the Sale-a-bration catalogue? We hope to see your creation added to our Facebook page (use the link over on the right if you need to) before next Sunday evening.

Next we are off to Julia and her super cute foliage card:

Sunday, 27 February 2022

#CTC358 CASE an Embossed Project


CASE an Embossed Project featuring either type of embossing and from any of the current catalogues.


Check out the Mini Catalogue Page 55 and the card on the right which was my choice.


I've chosen the same base card of Thick Basic White and top layer of Basic White. I've gone to my scrap folder and chosen four colours which I thought looked ok together - Real Red, Early Espresso, Mossy Meadow and So Saffron. 

If you look closely at the CASE card, I thought two of the colours were embossed and two were not so that's what I went with. I cut strips roughly the same as what I thought the card above and then a piece of scrap was used as a placement card to adhere my strips onto. I've popped the So Saffron and Early Espresso strips into the Timeworn Type 3D Embossing folder and embossed them. I had wide strips of differing widths and then after adhering them in place, I've snipped the ends off to suit. When I was happy I added this to the top mat. 

The greeting is from Handsomely Suited, stamped with Mossy Meadow ink onto Basic White and  diecut with the Tasteful Labels dies. This was adhered onto to strip panel and the whole mat was attached in place with Stampin' Dimensionals. I went with the (retired) Flowers for Every Season Gems as my bling.


The crew look forward to seeing which embossed project you choose to CASE. Post it to our Facebook page using the link over on the right before next Sunday evening.


Next on the hop we are off to check out Tina's stunning card:

Sunday, 20 February 2022

#CTC357 SAB Pg 6 Sketch


We are CASEing the Sketch top right of Page 6.

Here's the simplified sketch:

I cut a panel of Daffodil Delight the width of my card and a panel of the script from Vellum Layering Designs a little longer and adhered by sticking it to the back of the panel and wrapping it tightly around and then adhering the other edge so the sides are basically open but I didn't want to worry about adhesive showing through the vellum.

I've cut two strips of Mango Melody and diecut with the edging die from Peony dies then glued these behind the panel and attached it all to my base card. Next I've diecut a shape with the Tasteful Labels dies out of Smokey Slate cardstock and embossed it with Timeworn Type 3D Embossing folder and popped that lower on the panel. The Daffodil was pieced together using Daffodil Dies, Daffodil Delight, Mango Melody and Old Olive Cardstock. 

I've stamped the greeting from Blessings of Home in Night of Navy ink onto Basic white and popped one end against the edge of my card and stuck the other just under my daffodil stem. To finish I've used the little self adhesive Brushed Brass Butterflies.


Playing with some of the product from the new mini catalogue.


We look forward to seeing your take on the sketch and posting the photo to our Facebook page using the link over on the right. Just a few simple questions to join the group first, answer them and you're all set. 

Next up we have Kathryn and her cute card:

Sunday, 13 February 2022

#CTC356 CASE Heart & Home Colours


CASE the Colours of the Heart & Home DSP on page 59 of the Mini Catalogue; Pale Papaya, Garden Green, Misty Moonlight, Fresh Freesia, Cinnamon Cider and Basic Gray. You can use as many or as few of the colours as you choose.

It's been raining quite heavy for the last 24 hours so a perfect day to craft. I decided I would do some colouring with the challenge this week and have used all the colours mentioned above.

My go to when I don't have a project in mind is to pick up the catalogue and flick through to see what I have and whether it might work. This had me landing on the Free As a Bird stamp set on Page 83 and felt guilty at it not having been inked in some time.

I used Shimmery White cardstock and Basic Gray ink. Because I was going to use my Water Painters, I have immediately covered the image with Clear Embossing Powder to adhere to the wet ink and then heat set it. This is because Basic Gray water based ink will often bleed as an outline so I wanted to be able to colour without having to worry about that. Cinnamon Cidcr branch, Garden Green leaves, Fresh Freesia flowers The birds were sort of outlined/shaded in Misty Moonlight and then I added a wash of Pale Papaya over the front of them. The beaks were a stronger colour of Pale Papaya. 

I've stamped a greeting from the same Free As a Bird stamp set in Basic Gray ink and adhered this panel to a mat of Misty Moonlight.

My card base is Fresh Freesia and the full front panel was embossed with Timeworn Type 3D Embossing Folder then added to the base with the coloured panel added on top.

Always hard to capture sparkle on a card but a different angle may give it to you when blown up

We look forward to seeing you play along this week. Post your project to our Facebook page using the link over on the right.

Next up we have our Queensland friend Rebecca:

Sunday, 14 November 2021

#CTC344 CASE an Embossing Project


CASE an Embossing Project - you choose, heat embossed, dry embossed....


I've turned to Page 54 of the July-December Mini Catalogue and the card on the bottom right:


I've started with a piece of Basic White cardstock which I white heat embossed twice with the image from Quiet Meadow. I've then used the resist ink technique with Pool Party ink and a blending brush. Next I've dry embossed this with the Timeworn Type 3D Embossing folder. 

I've added a couple of strips of Pattern Party DSP. Onto this a diecut from Meadow Dies of foliage in Mango Melody was added, as it toned with my choice of DSP and added colour without the fussiness of the original card. My greeting is stamped in Basic Gray ink from Turtle Friends onto a strip of Basic White and adhered in place. 

The whole layer was added to a base of Basic Gray cardstock and finished with a few Metallic Pearls.


My embossing doesn't stand out as much as the original but it works for what I was after. Not sure if that was my colour sponging choice or the image I used was a little finer than the one they used to emboss.


We hope to see you play along CASEing an Embossing project this week. Just post your project to our Facebook page using the link over on the right. You have to join the page first and answer a couple of simple questions.

I can't wait to see what Rachel has to share with us this week:

Sunday, 17 October 2021

#CTC340 CASE a Bundle from Pgs 65-71


CASE a Bundle from Pages 65-71 of the Mini Catalogue


I've chosen the card on the bottom right of Page 70:

Instead of a Halloween theme, I've changed it to Christmas.

I've started with a base of Soft Succulent cardstock. I've trimmed a piece of Evening Evergreen for the top layer and cut the same size piece of Tidings of Christmas DSP. Before adding it to the mat, I've cut a small triangle off the lower corner and slightly larger off the top opposite corner.

My tag is made with the Stockings Dies and Cherry Cobbler cardstock. Texture was added with the Timeworn Type 3D Embossing folder. Next I've added a tab of Basic Black cardstock folded in half and stapled it in place. The tree is diecut with the Christmas Trees Dies from Evening Evergreen. The holly was stamped with Evening Evergreen ink and coloured with Stampin' Blends before being diecut with the same Christmas Tree dies. 

The greeting is from Whimsical Trees stamped in Evening Evergreen ink onto Soft Succulent cardstock.then diecut with the Tasteful Labels dies. 


This was possibly my least favourite DSP out of the pack but I feel it works well for this background as it is quite simple. I could have used two of any of the smaller trees but opted for one larger one as my tag was slimmer and it stayed in balance


What's your favourite bundle from the mini catalogue? We hope you'll post a card to our Facebook page using the link over on the right before next Sunday evening!

Next on the hop we have our friend Monique:

Sunday, 15 August 2021

#CTC331 CASE Mini Catalogue


Time to CASE the Mini Catalogue:


I've gone with the image on page 30, top middle:


Using the Sweet Stockings DSP, I've diecut three stockings using the Stockings Dies and then Basic White cardstock and the same die set, the little pieces for the toe and heel have been added to each stocking.

With the Timeworn Type 3D Embossing Folder and Basic White, I've embossed the panel I've layered my stockings onto. The Hostess Pattern Party DSP was my go to for the panel behind the main layer and I've also used that to stamp my greeting onto. This was from Penguin Place and using Cherry Cobbler ink, I've stamped and diecut with another of the Stockings Dies. All pieces were added to a Cherry Cobbler cardstock base.

Next on the hop we have our lovely Kathryn: